EndNote Online Classic Guide
This guide is used primarily in our EndNote Online Classic teaching at KIB for students at Karolinska Institutet. The guide is adapted to the version of EndNote Online that is available and free of charge for students and staff at KI trough our website. There is also a web-version of EndNote compatible with EndNote 21. This is not the same version.
With EndNote Online you are able to:
- collect and organise references
- import references to MS Word and create citations and a bibliography according to specific output styles
- in an easy way, change and update references.
1. Create a reference library
First, sign up for an EndNote Online account. You only need to fill in the mandatory fields. It's optional to use the KI email.
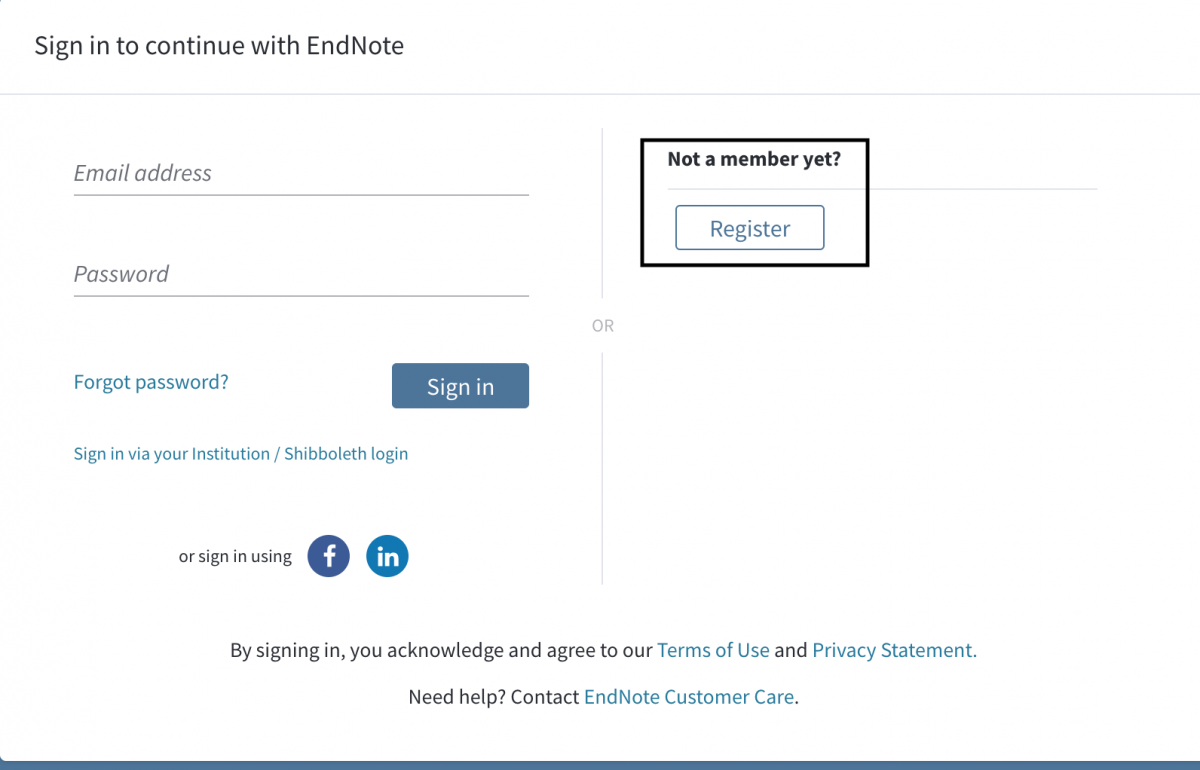
When you have created an account, you may as well go directly to EndNote Online next time you login to your EndNote Online library. However, once in a year you'll have to use this EndNote Online link to verify your account to KI:
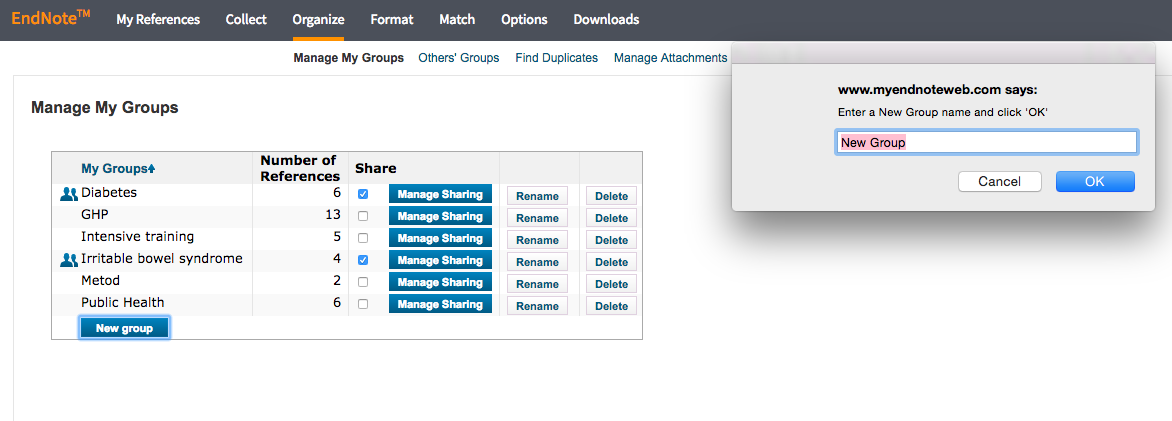
You can easily organise your references by creating groups. Go to the tab Organize and Manage My Groups and New group and give your new group a name. There, you can also delete or rename groups. Whether you have added your references into various groups, all your references are always accessible in All My References. It is from there that you distribute your references to the groups you create.
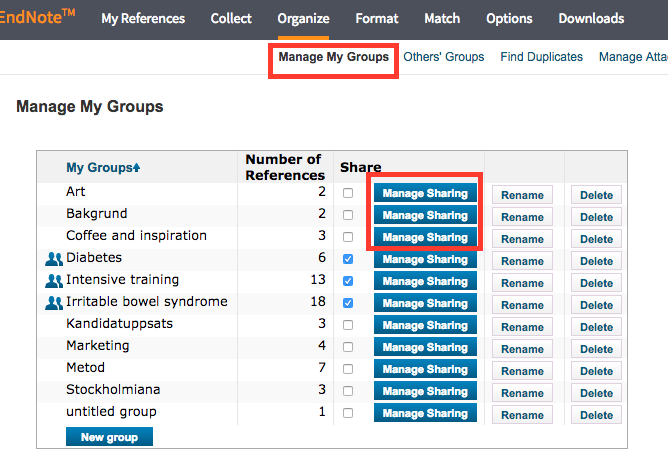
There is also an option to share references with others. Click on Manage Sharing and invite people by using the e-mail they used when they created their Endnote Online account.
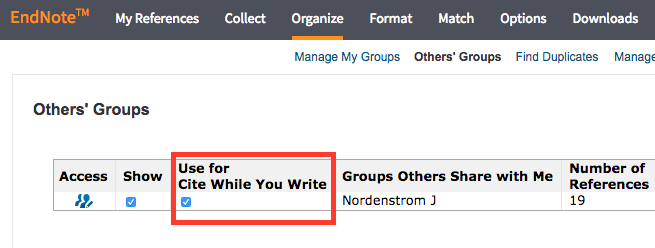
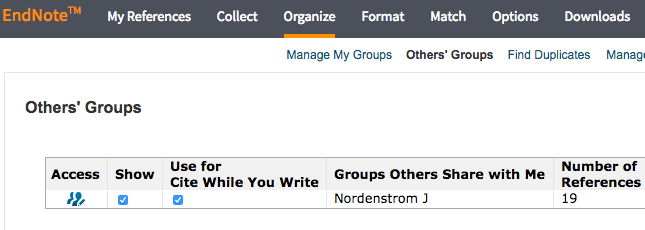
If you have shared groups of references with each other, you can import these references into Word. Which means, that if someone has shared a group with his or hers references with you, to be able to import these references to your Word-text, you need to check a specific box. Go to Organize and Other's Groups, there, you find the box called Use for Cite While you Write, check that. It could be that you need to logg off your Endnote library before it starts working.
2. Collecting references
Always check that your references have been correct according to the citation style you are using.
You can collect references in two ways in PubMed to EndNote online.
1)
- Conduct a search in PubMed
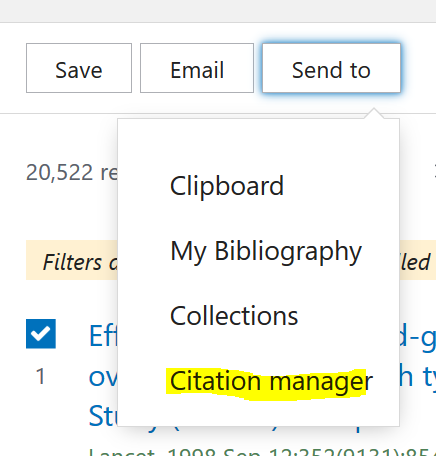
- Select the references you would like to export in to EndNote by using the check box to the left.
- Click on Send to above the results list.
- Choose Citation manager.
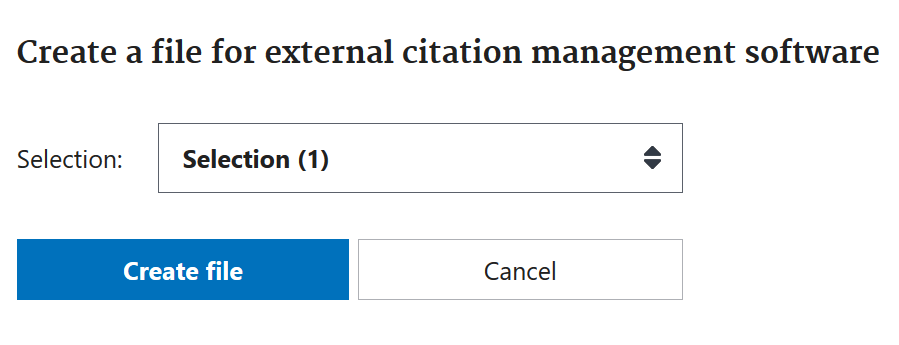
- Click on Create File and save the file in, for example, Downloads.
Or you can do like this:
2)
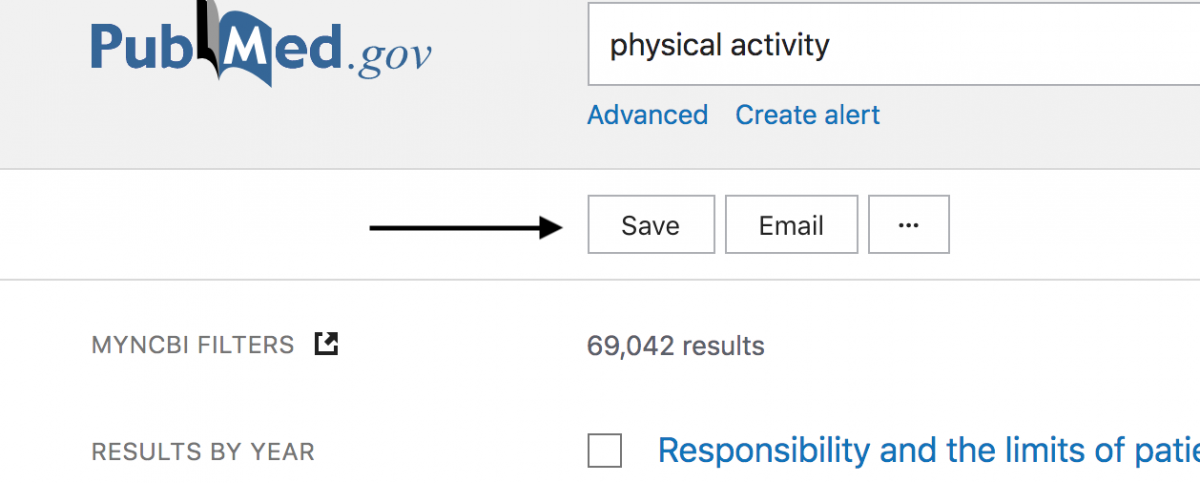
You save your references by clicking on the Save button. When you have done that, choose the PubMed format.
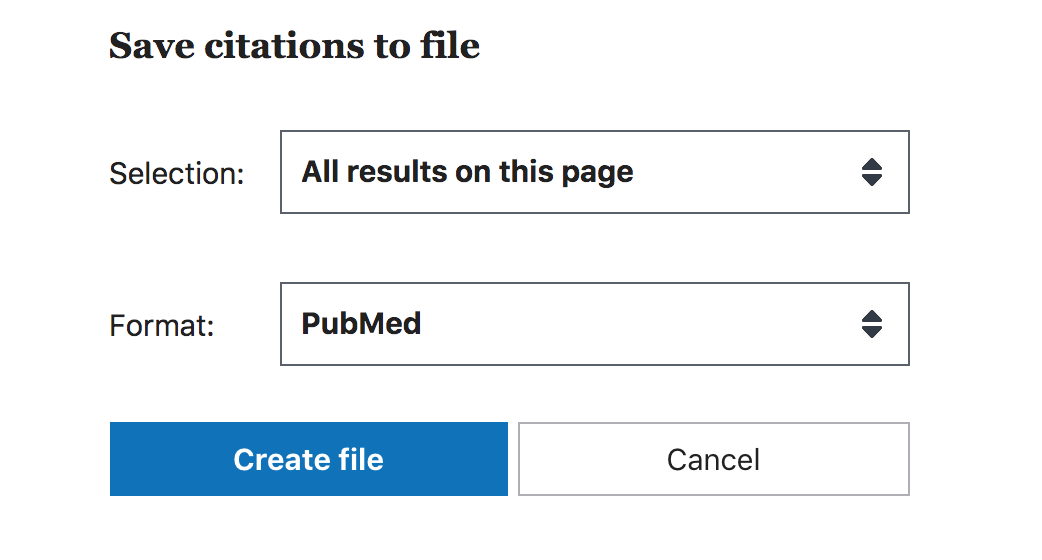
When you import the file containing the references into your EndNote Online library, you do like this: click on Collect, then Import References
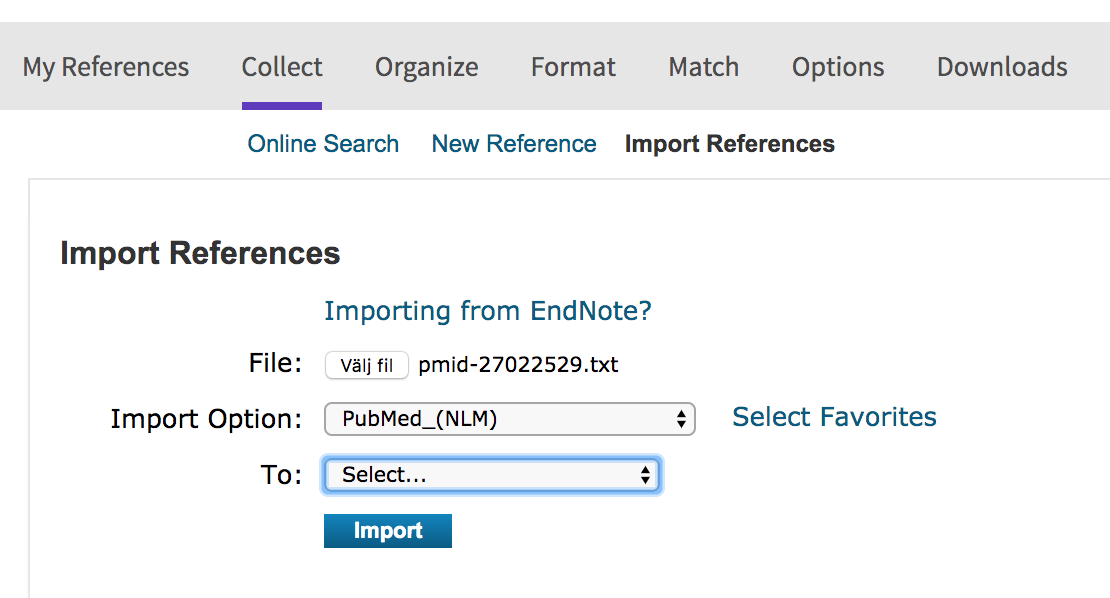
Choose the file containing the references, it is usually called pubmed-xxx-set and ends with .txt. or .nbib depending on your export option.
Under Import Option: choose PubMed_(NLM).
We have both CINAHL and PsycINFO via EBSCO, thus exporting from PsycINFO is similar to this description.
1. Conduct a search in CINAHL (EBSCO).

2. Select a reference by using the blue Add to folder button for saving your references in a temporary folder for later import in to Endnote Online. The blue button turns into a yellow folder (see the picture above) so that you easily can see which references you have saved temporarily.
3. In the right menu, choose Folder view.
4. In the right menu, choose Export for export of your references.
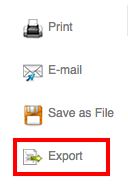
5. Choose Direct Export to EndNote Web and Save.

6. The references are added to your EndNote Online library.
1. Conduct a search in Web of Science.
2. Mark the references you would like to export to EndNote desktop.
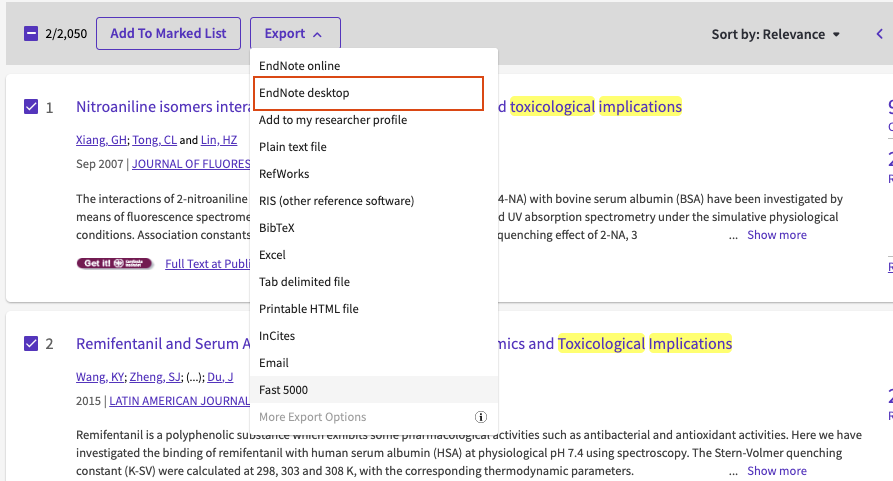
3. Click on Save to EndNote Desktop, the button above the result list.
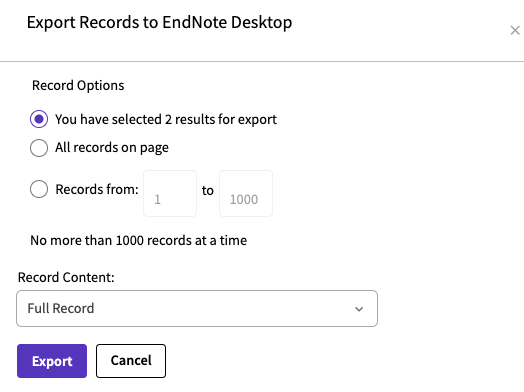
4. In the pop-up window, if you only want to export your selected references, proceed to step 5. But if you want to export all references, when fx. conducting a systematic review, you need to divide the references in batches (if the amount is more then 1000) and export them in separate files. Fx. first 1-1000, and then continue with 1001-2000 and so on until you have exported all references.
5. When you have decided which references to export, choose Record Content: Full Record, and then Export.
6. In EndNote, go to File and Import… and select ISI-CE as import option.
1. Conduct a search in Libris.
2. Mark the references you would like to export to Endnote Online
3. Click the button Cite at the bottom of the page.
4. In Format, choose .RIS in the menu.
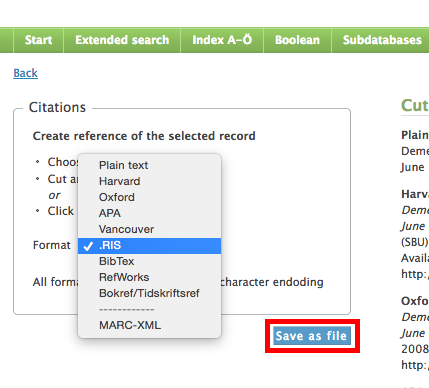
5. Then Save as file.
1. Click on Import References in the tab Collect.
2. Click on Choose File and browse the file in your laptop.
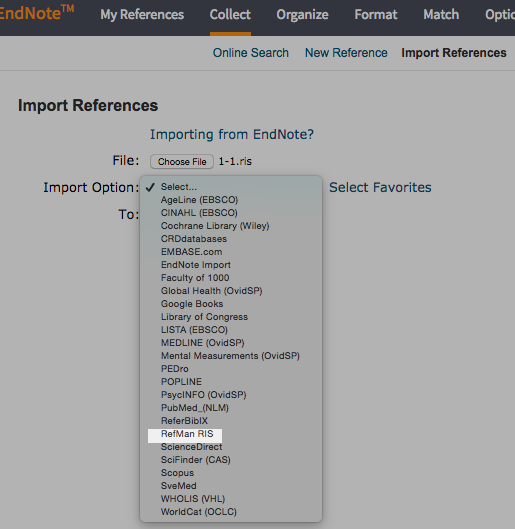
3. The next thing you have to do is to choose a filter in the Import Option, choose the filter RefMan RIS.
4. Choose in to which group you would like to add the references.
5. Click on Import.
Firstly, change a setting in Google Scholar: click on Settings and in the Bibliography manager, choose Show links to import citations into EndNote and Save.

Conduct your search in Google Scholar.

Click on Import into EndNote (only one reference can be imported at the same time) and save the file.
- Click on Import References in the Collection tab.
- Choose File and upload the file.
- In the Import Option drop-down menu, choose EndNote Import and then choose a group.
- Choose in to which group you would like to add the reference.
- Click on Import and you're done!
1. Conduct a search in reSEARCH.

2. When you have found a reference you want to save to your Endnote Online library, click on the three small dots to the right.
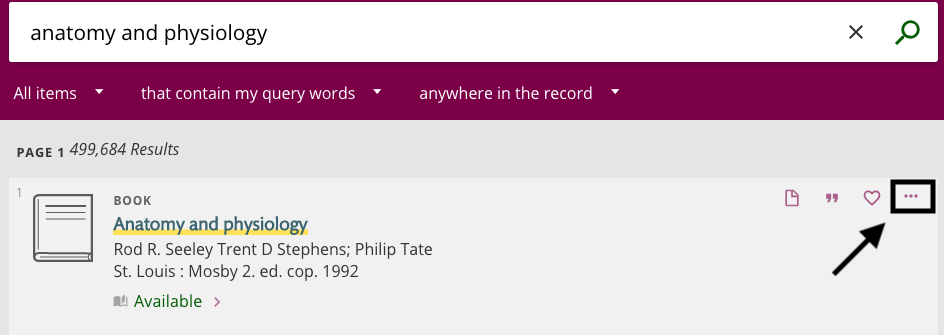
3. Then you get the possibility to save the reference to Endnote Online.

4. The reference is saved in your Endnote Online library.

If you want to cite a webpage, you have to add that reference manually to your Endnote Online library. You do this in Collect and New Reference.
In Reference Type choose Web Page, if it is a web page you want to cite.
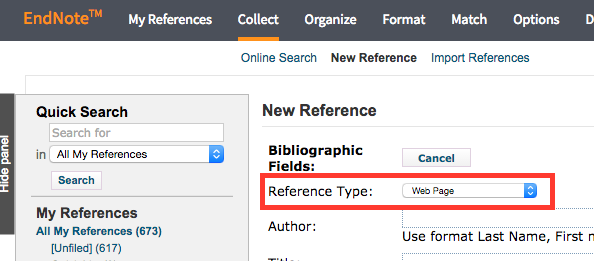
The fields that then need to be filled in according to the Vancouver style are: Author, Title [Internet], Year, Place Published, Publisher, Access Date, Access Year and URL.
The fields that then need to be filled in according to the APA style are: Author, Title, Year, Access Date, Access Year and URL.
Are you unsure of what information that should be included in the reference? Use our reference guides in the Vancouver and APA systems.
3. Use citations (Word-Mac)
In EndNote Online there is a plug-in to Microsoft Word – Cite While You Write (CWYW) – to be used for inserting citations in the text while you write.
Important! Make sure your Office package for Mac has the latest updates! You find them in the Help menu in your laptop.
This plug-in is compatible with:
PC: Office 2003, 2007, 2010, 2013 and 2016
Mac: Office 2008, 2011 and 2016
To install the plug-in on your own Mac, log in to EndNote Online, click on Format and Cite While You Write Plug-In. Choose Download Macintosh.

When the plug-in is installed, a new tab is created in your Word-programme. Or The CWYW menu is found under Tools in Word.

When the CWYW menu is installed you need to go to Cite While You Write Preferences..., choose EndNote online and log in with your Endnote Online account.

If you are not seeing the EndNote tab, or if the EndNote tab disappeared after updating to the latest version of Word 2016, you can try to follow the instructions on these sites:
When you need to insert a citation:
1. Place the cursor where you want the reference to be inserted in the text.
2. Click Insert Citation.

3. A dialogue box will turn up. For example, type in an author name or title words in the search box. It is important to use the correct spelling of a word or name when you search. Otherwise you will not get any result. A recommendation is to copy the title of the reference to be inserted from your Endnote Online-group.
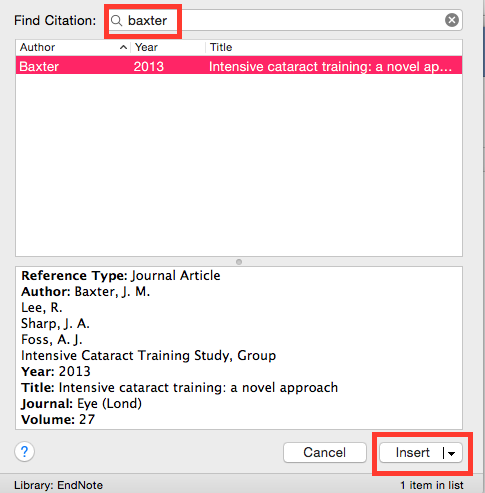
4. Mark the reference and click the button Insert. The reference will be inserted as a temporary reference as follows: {Baxter, 2013, Intensive cataract training: a novel approach}
5. Continue writing in your work and insert references as above.
References shared with someone else
If anyone else shared a group of references with you that you want to be able to put into Word, do like this: In Organize, go to Other's Groups and to the group you've been assigned. Check the box sayin Use for Cite While You Write. Log then off from your Endnote library and log in again. If it doesn't work directly it's because it could be a delay.
When finished and a reference list needs to be created, choose Configure Bibliography...

Choose your citation style in the drop-down menu under With output style and then OK.
Then OK. Your bibliography is created in the end of the document.
If you want to change the citation style, repeat the procedure and change to another style in the drop-down menu under With output style.
If this box pops up, you need to make a simple correction to select or change the citation style.
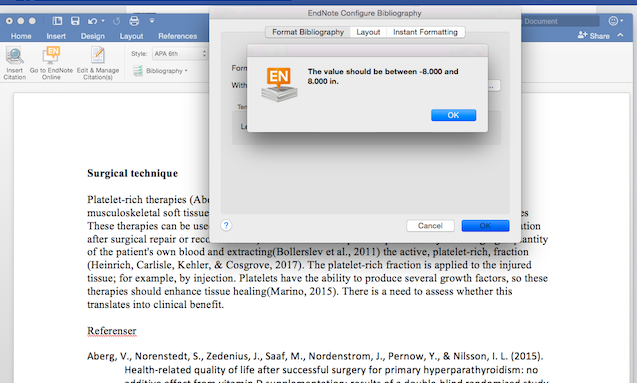
First, click OK.
In the next box, underneath:
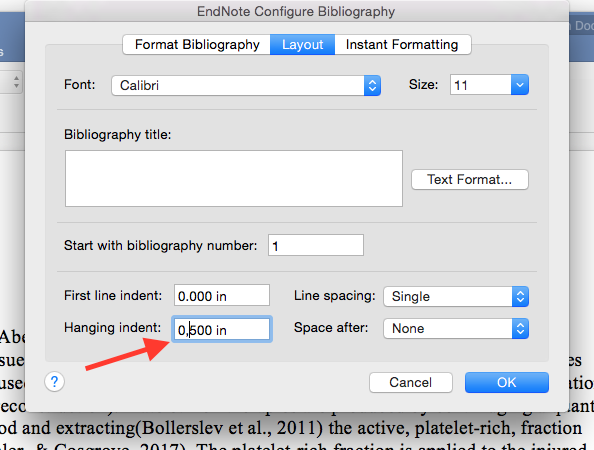
change the box asking for Hanging indent, from a dot to a comma, as on this picture above. Then OK.
This correction may need to be done everytime you update your document.
Separate reference list
If you need a list of references, for example for a literature list, do the following:
- Move the references you want in the reference list to a folder under the tab My References.
- Under the tab Format choose Bibliography.
- By References, choose that folder in which you put the references.
- By Bibliographic style, choose the style you want your references to be formatted in.
- By File Format, choose for example TXT (plain text file).
- Click any of the buttons that give you the possibility to save, e-mail or print the reference list.

If a reference needs to be changed, if for example a year is missing, don´t do that change in Word, but do it in your Endnote library. Otherwise the change will disappear the next time you update your document. So in Endnote Online, go to the reference that needs to be changed, click on the title of the reference in the list of references and in the form, click on the fields that need to be updated and Save.
Go to Word and click on that reference you have changed in Endnote. Now there are two ways for the change to break through in Word:
1. Click on Unformat Citation(s). Now all your references will be unformatted.
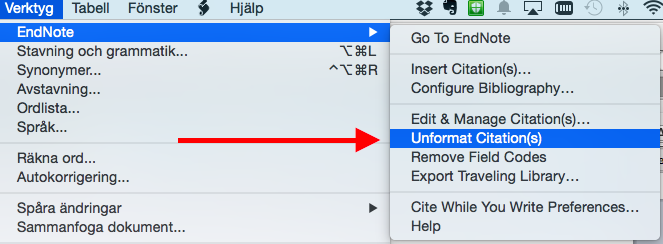
Click on Configure Bibliography and OK. Now all your references are updated and formatted and the reference is changed.
If you have tried the first alternative and if it didn´t work. Try this one instead, click on the reference in Word. Then right click and choose the last one in the menu, Edit Citation(s) and then More....
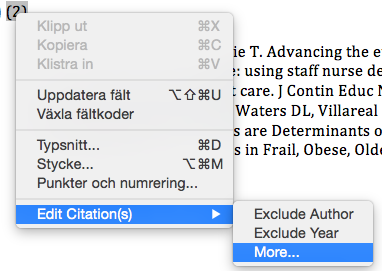
It will pop up a new window and control that it is the right reference that is marked. Click on the small arrow to the right of the reference and choose Update from My Library...
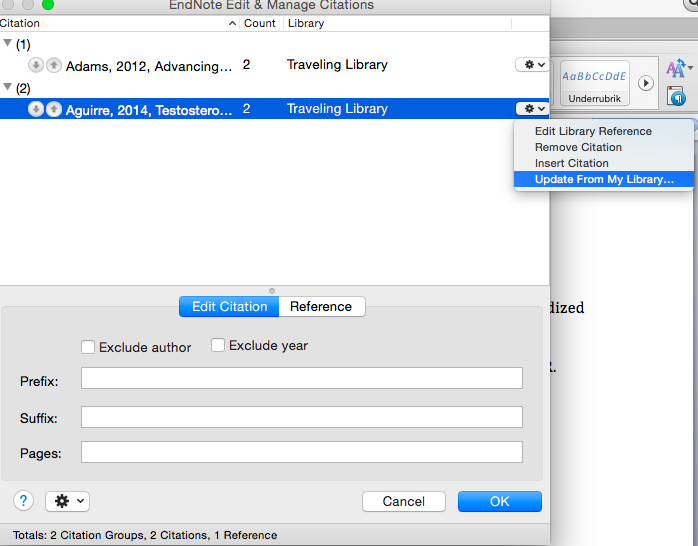
Then a new window will turn up asking if you want to insert the updated reference, click on Insert and then OK. Now the change has gone through.
When the document is complete and ready to be sent in to for example the supervisor, it is important that the Endnote codes are removed from the document. The codes are unvisible but necessary for the function of the connection between Word and Endnote Online. So before sending it, save the version with codes (for your own work) and save one without codes and send that version.
Click on Tools and then Convert to Plain Text.

A dialogue box will appear asking if you want to save the document before you remove the field codes. Click on Save.
Important! Name the document so it is obvious which document that still has the field codes and which does not, for example "with codes" and "without codes".

Answer Yes to save a copy.
4. Use citations (Word - PC)
There is a plug-in to Microsoft Word – Cite While You Write (CWYW) – available to download in your Endnote Online library. You use the plug-in to insert your citations into your text. The plug-in is compatible with:
PC: Word 2003, 2007, 2010, 2013 and 2016
Mac: Word 2008, 2011 and 2016

If you wish to download the plug-in to your own laptop, start with loggin in to Endnote Online, click on Format and Cite While You Write Plug-In.
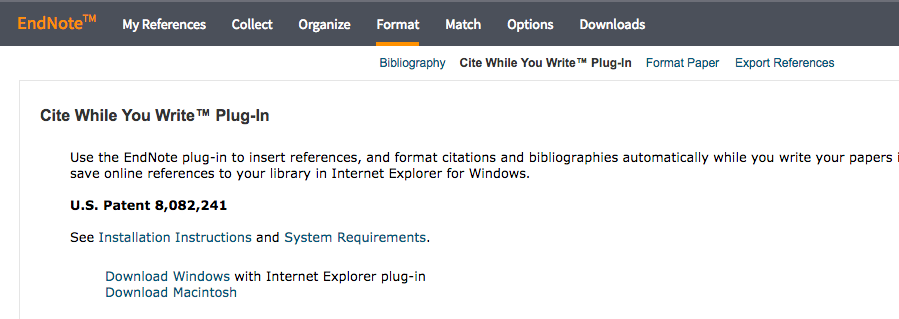
Close all windows connected to Microsoft, like Word or Outlook before you start the installation.
While installing the plug-in you get some choices:
Set Server choose Default.
Select Features choose Cite While You Write Microsoft Word.
When you need to insert a citation:
1. Place the cursor where you want the reference to be inserted in the text.
2. Then Find Citations.

3. A dialogue box will turn up. For example, type in an author name or title words in the search box. It is important to use the correct spelling of a word or name when you search. Otherwise you will not get any result. A recommendation is to copy the title of the reference to be inserted from your Endnote Online-group.
4. Click Find.

5. Mark the reference and click the button Insert. The reference will be inserted as a temporary reference.
6. Continue writing in your work and insert references as above.
Shared group of references
If anyone else shared a group of references with you that you want to put into Word, do like this: In Organize, go to Other's Groups and to the group you've been assigned. Check the box sayin Use for Cite While You Write. Log then off from your Endnote library and log in again. If it doesn't work directly it's because it could be a delay.
When you have inserted your citations into your text and need the bibliography, click the small arrow, down to the right in the group Bibliography. A dialogue box will turn up.

Choose the document you are working with in the first dropdown menu and then choose the citation style to use for your references in the dropdown menu under With output style heading.
Click OK and your bibliography is created in your document.
You can always change the citation style by repeating as above. When the new style is chosen the entire document will be updated into the new style.
If you need a list of references, for example for a literature list, do the following:
- Move the references you want in the reference list to a folder under the tab My References.
- Under the tab Format choose Bibliography.
- References: choose that folder in which you put the references.
- Bibliography style: choose the style you want your references to be formatted in.
- File Format: choose for example TXT (plain text file).
- Click any of the buttons that give you the possibility to save, e-mail or print the reference list.

If a reference needs to be changed, if for example a year is missing, don´t do that change in Word, but do it in your Endnote library. Otherwise the change will disappear the next time you update your document. So in Endnote Online, go to the reference that needs to be changed, click on the title of the reference in the list of references and in the form, click on the fields that need to be updated and Save.
Go to Word and click on that reference you have changed in Endnote. Now there are two ways for the change to break through in Word:
1. Click on Convert to Unformatted Citations, the button below Convert Citations and Bibliography. Now all your references will be unformatted.
Click on Update Citations and Bibliography. Now all your references should be updated and formatted again, and the change of the reference should have break through.
2. If you have tried this and it did not work, click on the reference you need to change in Word. Then, right click and choose the last alternative in the menu Edit Citation(s) and then More.
Then a small box will turn up and control that it is the correct reference that is high-lighted. Click on the small arrow to the right of the reference and choose Update from My Library... Then, a new box will turn up asking if you want to insert the updated reference, click on Insert and then in the next box, OK. The change has hopefully broken through.
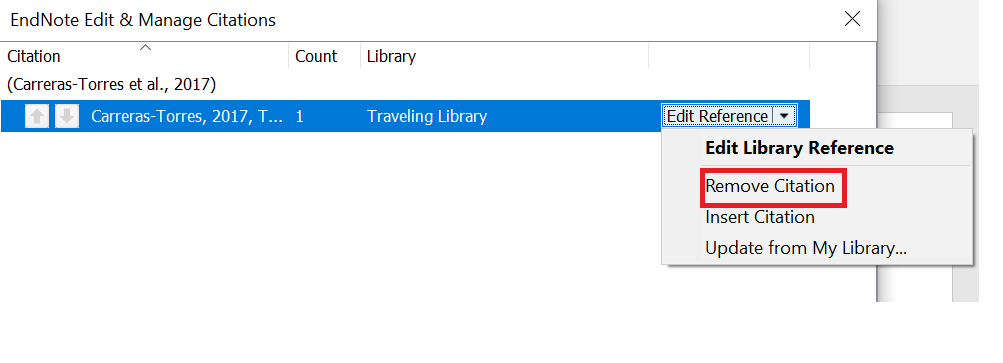
If you need to delete a reference in word, click the Edit Citation(s) icon in the meny.

Click the Edit Reference drop-down menu and select Remove Citation.
When the document is complete and ready to be sent in to for example the supervisor, it is important that the Endnote codes are removed from the document. The codes are unvisible but necessary for the function of the connection between Word and Endnote Online. So before sending it, save the version with codes (for your own work) and save one without codes and send that version.
1. Click on Convert Citations and Bibliography. Choose Convert to Plain Text.

2. A dialogue box will turn up asking if you want to save the document or continuing without saving the field codes. Choose Yes and save the document with codes and then the one without codes.
Important! Name the document so it is obvious which document that still has the field codes and which does not, for example "with codes" and "without codes". If the document with the codes is removed you can not get the codes back again.

It is important to answer Yes so that a copy is created to save with all codes left.
5. FAQ
If you want to cite a webpage you need to create that reference manually in your Endnote Online library. Go to Collect and New Reference.
In Reference Type, choose Web Page, or the actual reference type you want to cite.

The fields that then need to be filled in according to the Vancouver style are: Author, Title [Internet], Year, Place Published, Publisher, Cited Date, Cited Year and URL.
The fields that then need to be filled in according to the APA style are: Author, Title, Year and URL.
When the Author field is an organisation then fill in the entire name with a comma after. That is
World Health Organization,
Otherwise, the order of the words will be wrong.
If the author is a person, fill it in like this
Carlsson, Jan without comma after the first name
If there are several authors, enter each name on a new line.
If you want to cite a report, at first, control if the report is available in Libris because then you could export it from Libris which is the best alternative. If you can't find it in Libris you need to add i manually into your Endnote Online library. You do this in Collect and New Reference as in the picture above. In Reference Type at the top of the list, choose Report if it is a printed report or choose Web Page if it as a report you've found on the Internet.
Look for instructions on which information you should add into some of the fields in the rest of the form in the APA or Vancouver guide.
Consider a pair of things concering reports from the internet:
In the Vancouver system, the word Internet has to follow after the title so write it in the Title field in Endnote Online.
In the field in which you add a date for your citing, you should write cited, followed by the date.

If you are going to write an essay/article/report/text together, thinking about how you will be able to integrate Endnote Online when you are working together with the same document? Then there are a few things you should consider.
One possibility is to add a shared Word document in a location that both access and then create a shared Endnote Online account. Then, ensure that only one person at a time, work on the document. This should work reasonably well. What you absolutely should avoid is to use multiple Word documents as this can create major problems. If many Endnote Online accounts, it is important that the references you use in the text also appears in the Endnote Online accounts you use.
Our recommendation at collaborating on a document, though, is that one of you becomes sole administrator of the Endnote Online part. Our experience is that you will encounter less worry if you do it this way. This means that if you write a text, but is not liable for the Endnote part, instead, you can make notes in the text where you want to insert references with clear information about what/which references it is about so that the designated administrator in retrospect, can insert the correct credentials.
If you have shared groups of references with each other, you can import these references into Word. Which means, that if someone has shared a group with his or hers references with you, to be able to import these references to your Word-text, you need to check a specific box. Go to Organize and Other's Groups, there, you find the box called Use for Cite While you Write, check that. It could be that you need to logg off your Endnote library before it starts working.
Make sure you have had the Office-programme closed during the installation of the EndNote-plug-in?
Make sure you have made the latest updates for Word and do you have a version of Word that is compatible with EndNote?
Contact the EndNote support for help. You can either chat or email them.
Important: Check regularly that you don´t have any duplicates in your Endnote Online library! It is important to have deleted them before you start adding your references in to Word. You see if you have duplicates in the tab Organize and then Find Duplicates. Do an extra check by sorting all your references on for example Title and you will easily see if you have any duplicates or not.
Although the references are created automatically by importing small text files from databases, some flawls can occur. One typical example is journal titles.
When importing references from Pubmed, the journal titles are abbreviated according to the NLM standard, for example: N Engl J Med. But other databases, like Web of Science and Cinahl, include full journal titles, so instead of N Engl J Med. it looks like this The New England Journal of Medicine.
This difference might cause troubles when creating bibliographies according to a specific citation style.
At Karolinska Institutet, Vancouver and APA are the most common used citation styles. When using APA, the full journal titles should be used, but according to Vancouver they should be abbreviated.
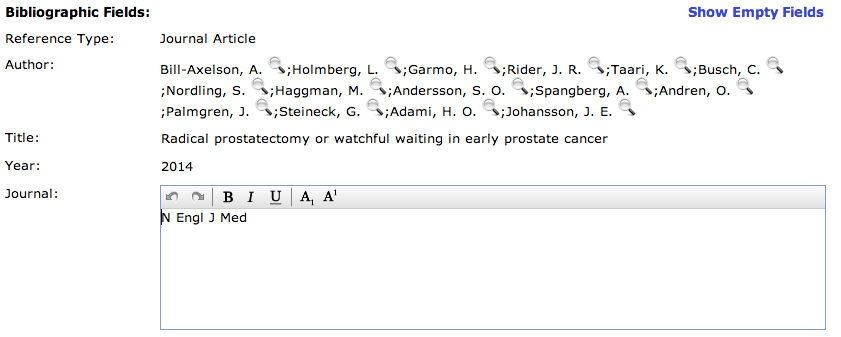
You may change the bibliographic information by clicking on the fields, in this example below the field Journal:

If the reference is imported from Pubmed, the full journal title can be found in the field Alternate Journal.

Full and abbreviated journal titles can also be found in the NLM Catalog.
Would you like to know more?
Besides this guide that step by step explains how to use EndNote Online, you can also find more information on these pages:
Always check that your references are correct according to the reference style you use:
If you would like us to get back to you, please submit your contact information in the form below along with your feeback.
