EndNote 21 guide
Welcome to this EndNote 21 guide by the Karolinska Institutet University Library. The main purpose is to provide course material for our workshops in EndNote 21.
This guide will help you create a reference library and get started with the key functions of the software. It includes print screens for Mac and Windows and is only available in English.
When we advise you to click on Preferences it's an instruction for PC users. If you have a Mac you choose Settings instead.
The EndNote software allows you to collect, organize and maintain a library of references, find and save full-text journal articles, and insert and format references in a MS Word document. The references and PDF's in your library are searchable.
Note!
We strongly recommend that you always work with one library only. Using several EndNote libraries can in the long run create problems.
The EndNote library should be kept on your own computer. Don't store an EndNote library on any cloud service and do not store a working library on a flash drive. If you choose to use the EndNote sync feature you will save the library on the EndNote cloud service and have access to it via EndNote Online or the EndNote app (available for iPhone and iPad).
Also, make sure to back up your library at a regular basis using the Compressed Library command (for libraries smaller than 4G), or the Save A Copy command for larger libraries. You can also read more on the EndNote website on other compressed file options for larger libraries.
1. Create a reference library
There are four principal ways to import references to Endnote:
- Search for references in a specific database, select the references you want and then use the export feature in the database. In some cases you have to save the references in a file and import them.
- Connect to a database via the EndNote interface and import references directly.
- Import and create references from a PDF or folder of PDF's.
- Create a new reference manually.
Depending on your workflow and preferences, you may use different methods.
Option one is preferable if you are conducting a more advanced literature search. If you already know a selection of references to import, for example an author name or article title, you probably would benefit using option two. And if you have a collection of PDF's, option three would be most suitable.
Creating references manually is quite difficult and should be avoided. However, in case you do not find a reference in a database or library catalogue, for example a web page, creating a reference manually is necessary.
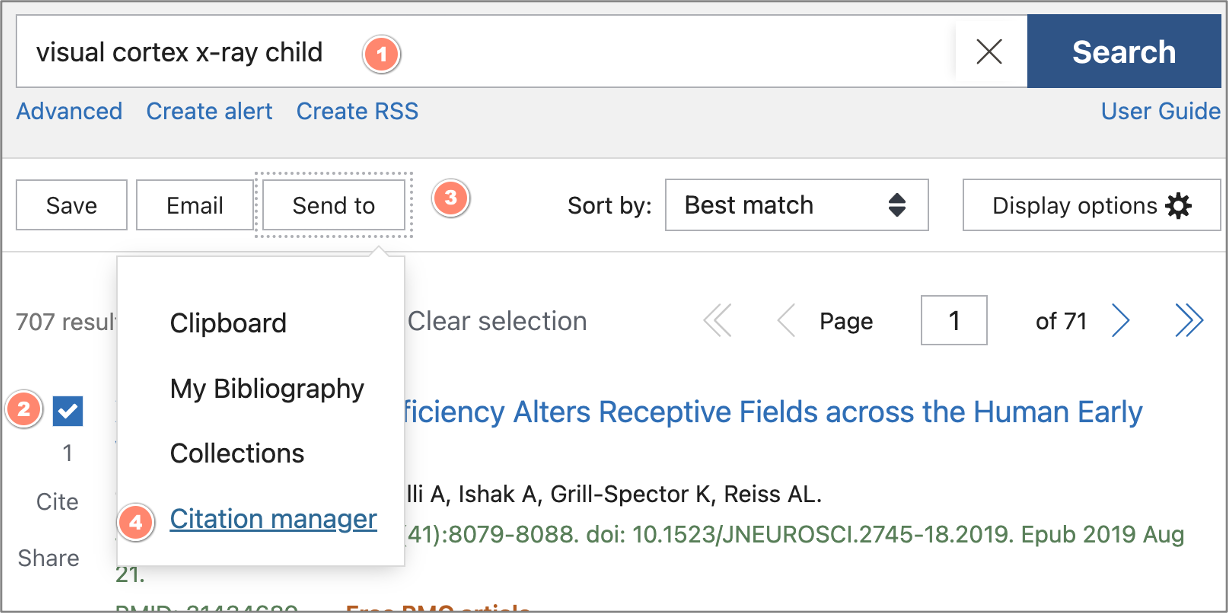
1. Conduct a search in PubMed.
2. Select references to import using the check boxes (or, for an individual reference, also the Cite button).
3. Click on the Send to button.
4. Choose Citation manage.
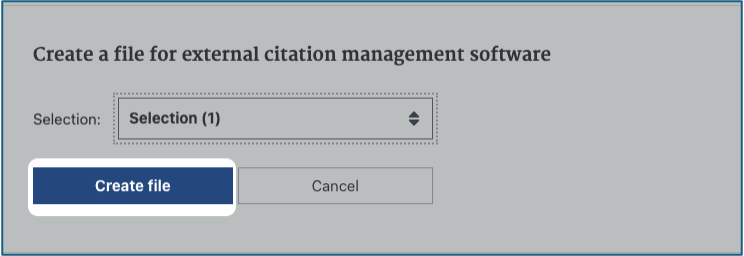
5. Click on Create File.
In Chrome, Firefox and Safari:
When the file is downloaded to the computer, right-click the file and choose ”Open with“ and then ”EndNote 21“. You can tick a box and have Chrome do this automatically in the future.
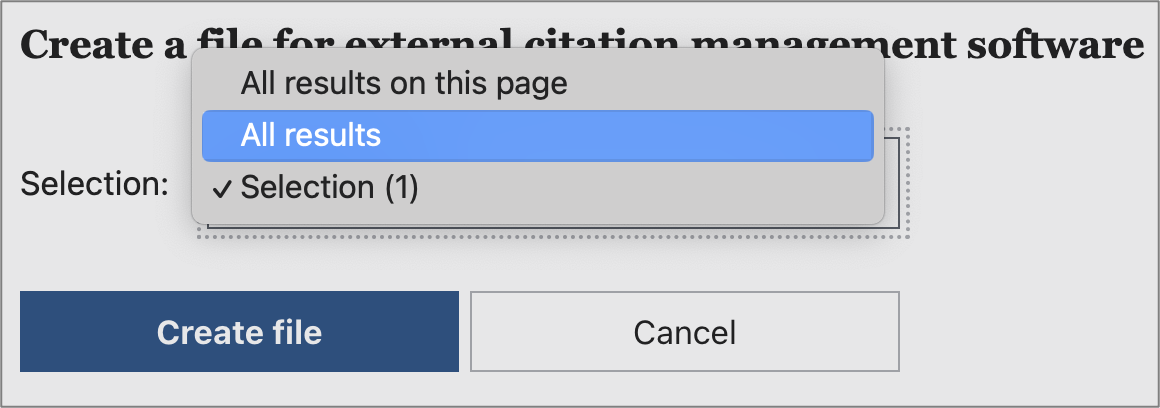
Are you conducting a systematic review or need all results for some reason, click on All results instead of selection.
Importing references from another database? See Part 4: More databases - Single reference export or Part 5: More databases - bulk export
Using the Online Search functionality, i.e. connecting to a database via the EndNote interface, is convenient when searching for a specific article. For more advanced search functionality, use the database interface directly.
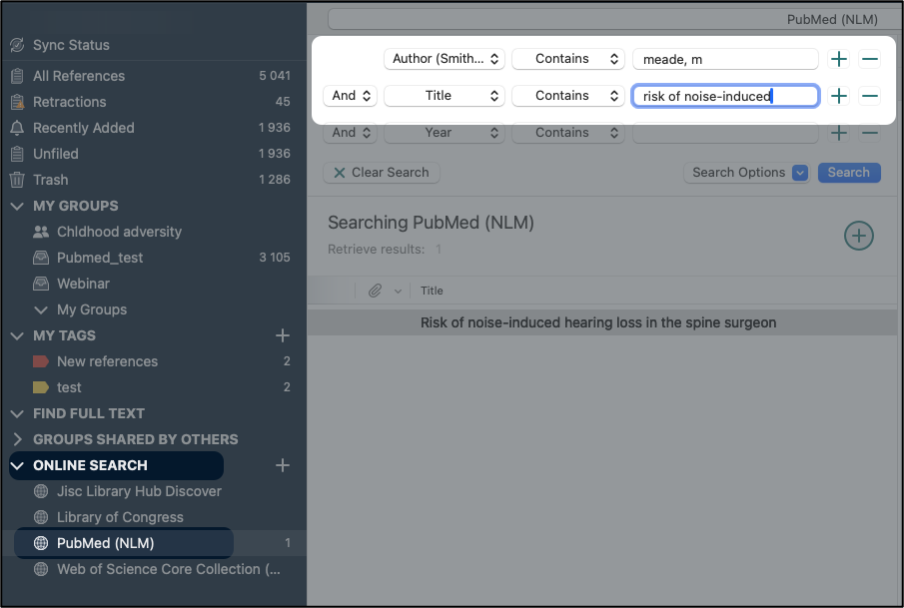
- In this example we conduct an article search (author and title) in PubMed. Be sure to change the search field.
- The references will show up. Mark the references you want to copy to your library using the Copy References to command from the References menu or right click on the mouse, choose Copy References to and choose your library.
You may import and create a reference from a PDF. EndNote uses the DOI (Digital Object Identifier) number in the PDF to extract bibliographic information from the article and create a reference. The program also attaches the PDF file to the reference.
Go to:
File → Import → File
[MAC] Make sure the drop down menu “Import options” is set to PDF File or Folder
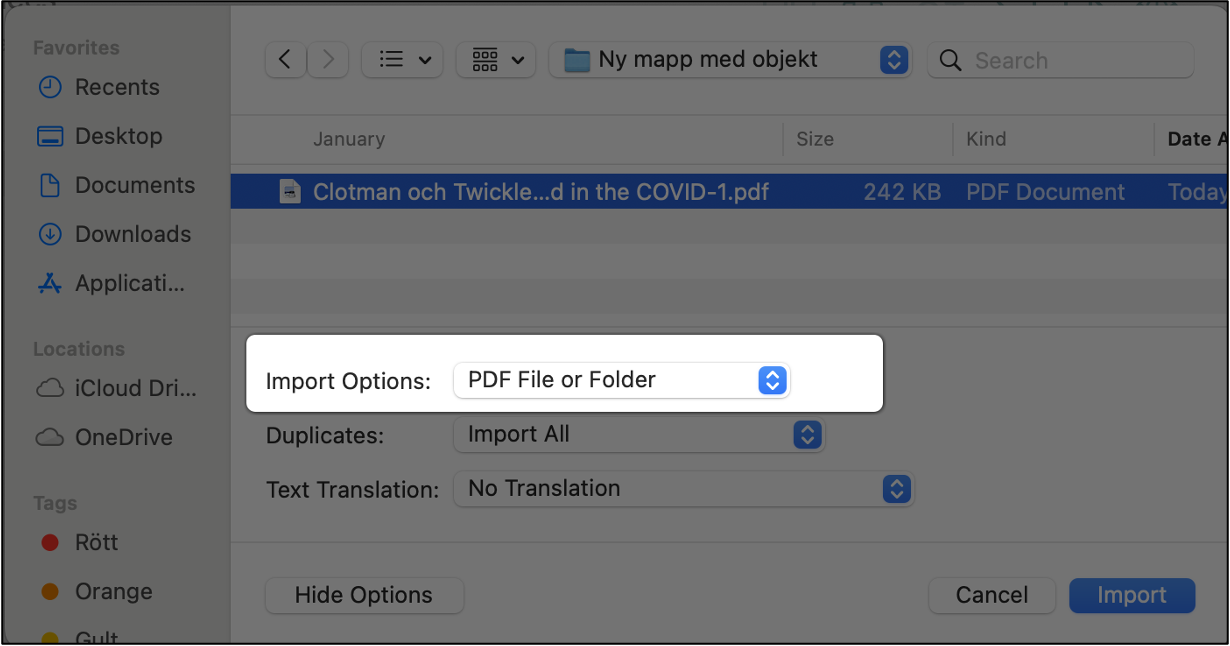
If you want to import a folder of PDF's:
File → Import → Folder
If the PDF does not contain a DOI, Endnote will create a blank reference containing only the file name of the PDF file in the title field. The PDF will be attached to this blank reference.
You can also use the PDF Auto Renaming Options, which automatically renames your PDF files to a more convenient name. And by using the PDF Auto Import Folder, Endnote will automatically watch a folder on your computer for PDF's and import them. Go to → Edit → Preferences → PDF Handling on a PC or → EndNote 21 → Settings → PDF Handling on a Mac.
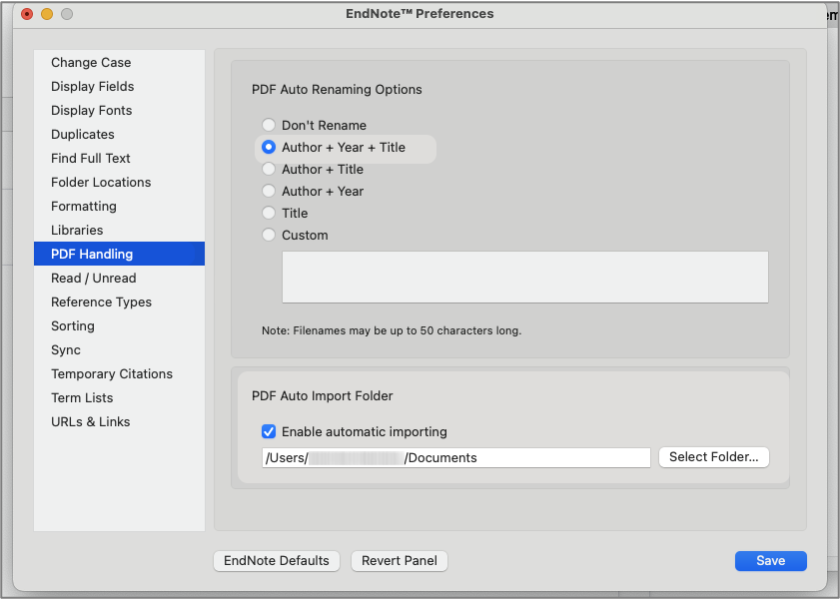
You can attach files to the references in your library, for example full text articles in PDF.
- Start by saving an article in PDF on your computer.
- Mark the reference you want to add the PDF-file to.
- Go to References → File Attachments → Attach File.
- Find the file on your computer and click Open.
You can also drag and drop the PDF file to a reference you already have in your Endnote library!
You can also locate and download articles in full text automatically.
You can improve retrieval of subscribed material, when you are off-campus, if you go to Edit → Preferences → Find Full Text on a PC, or EndNote 21 → Settings → Find Full Text on a Mac, and paste the following link in the field OpenURL Path and URL as shown in the screenshot below.
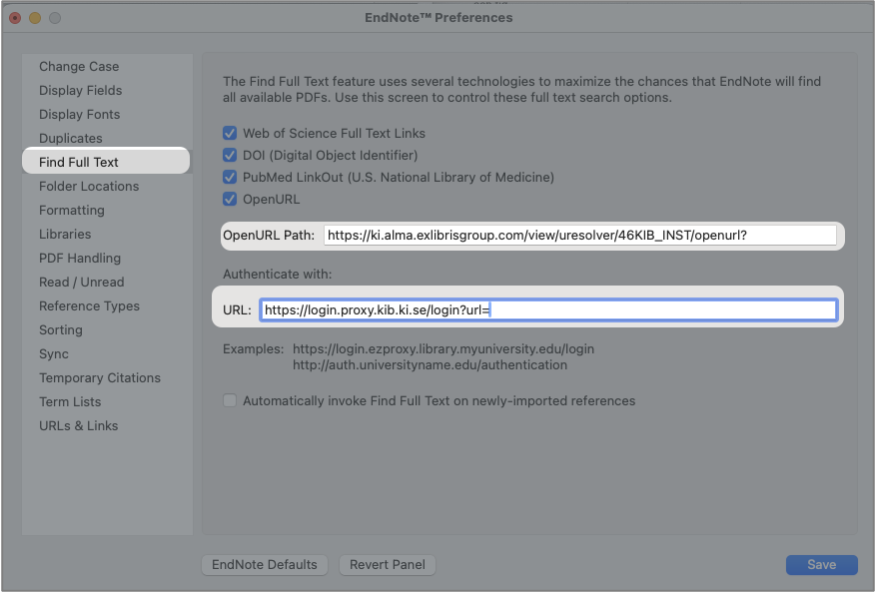
The automatic Find Full Text search works best if your references have good metadata. If you notice the references for example don't have DOI:s you can use the Find Reference Updates function.
First you need to mark the references that need to be updated. Then you go to References → Find Reference Updates
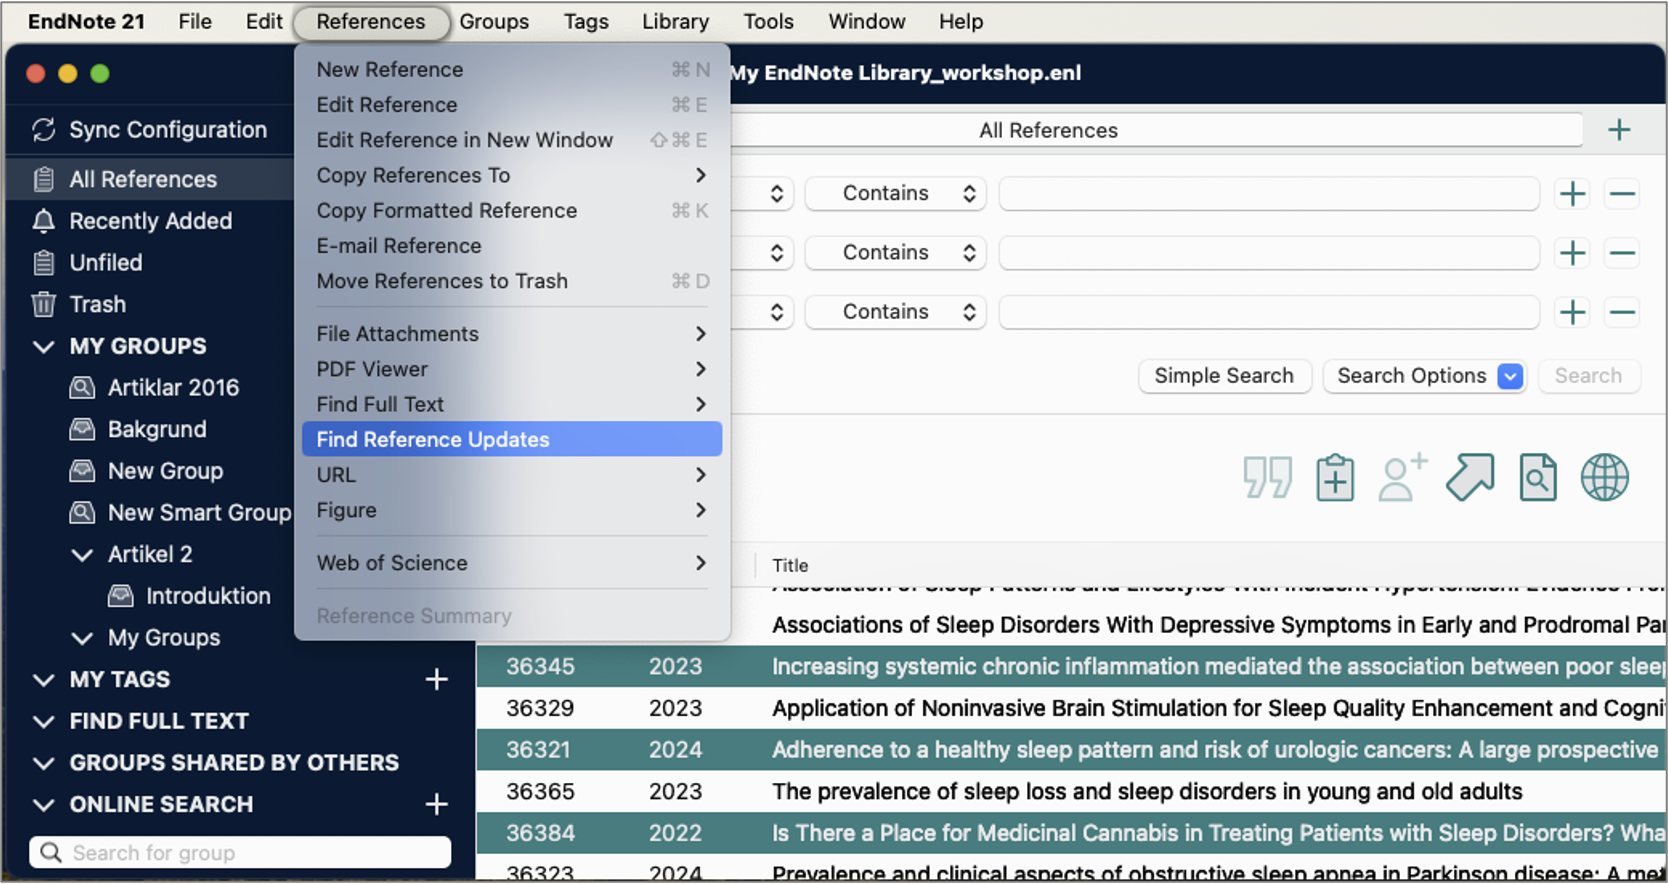
When all is set you can proceed to:
- Select the references you wish to attach a PDF to.
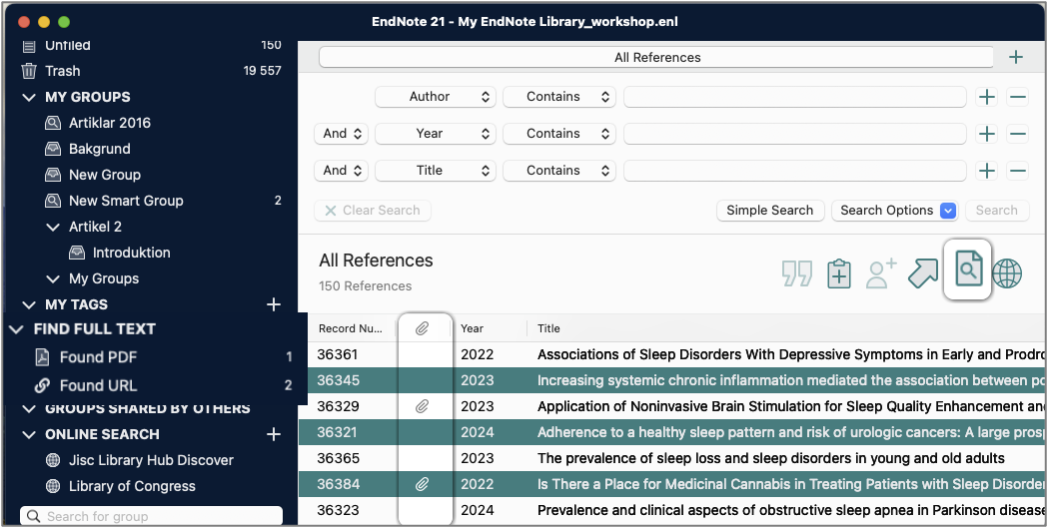
- Use the magnifying glass with the pdf symbol in the tool bar or right click in the selected reference(s) and select Find Full Text.
- Endnote will start searching and downloading full text PDF's to the references.
In the column File Attachment you see which references have an attached file, indicated with a paper clip symbol. You’ll find the result on the left panel of the Find Full Text operation.
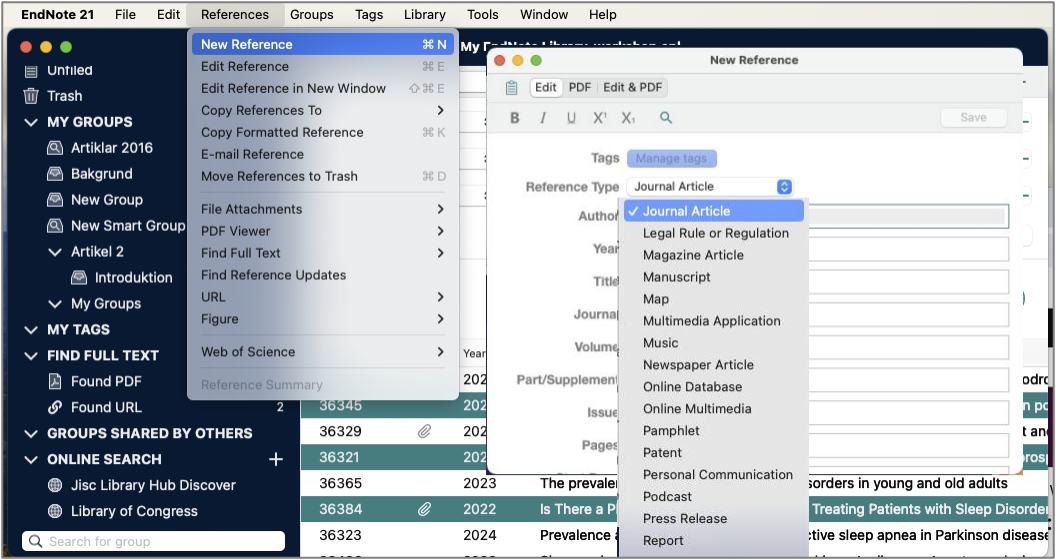
If you don’t find your material in a database or library catalogue, or want to cite an unpublished document, the alternative is to add the reference manually. However this could be a bit tricky.
- Click on References → New Reference...
Fill in the appropriate fields. If you have another kind of Reference Type, for example Web Page or Social Media, select the correct type in the list.
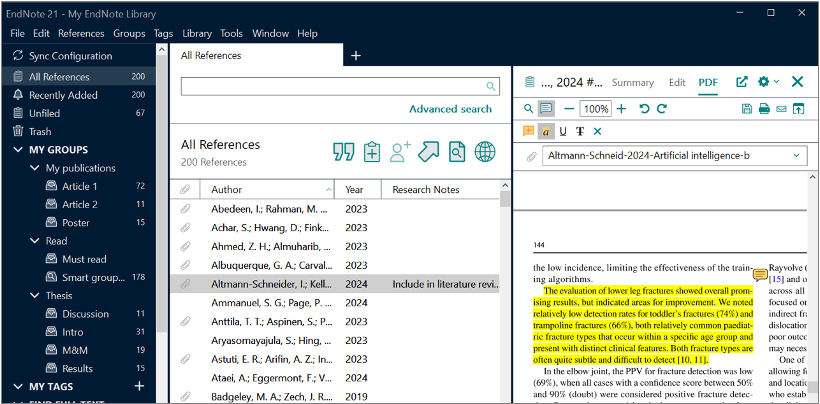
It's possible to make annotations and highlight text in the PDF's and to add sticky notes.
- Select a reference and click on the PDF tab.
- Use the toolbar to add a sticky note or highlight text.
Take a closer look at the toolbar. And this looks different on a Mac.
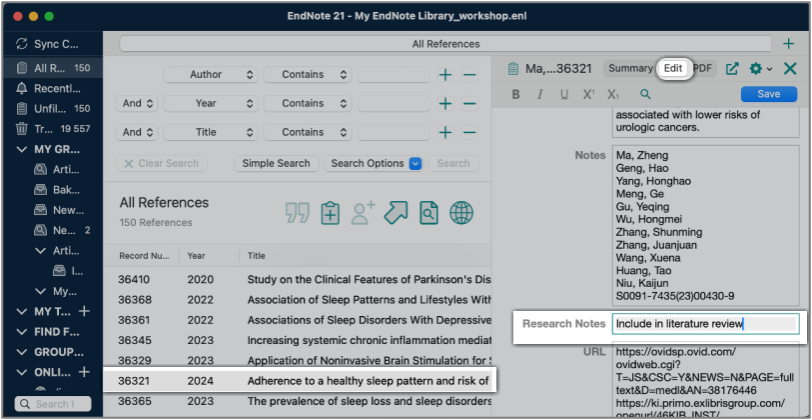
You can use the Research Note field to add a comment to a selected reference. Select the Reference tab to the left. Make sure you are in the Edit mode. You can write a comment in the Research Note field in the reference you have to the left side of the text or you can make a note directly in the PDF file.
You have 10 columns, displaying fields from the reference, in your library. You can organize the display fields as you want.
On a Mac: EndNote 21 – Settings – Display Fields
On a PC: Edit – Preferences – Display Fields (See figure below)
- Choose Record Number in column 1.
- Choose Author in column 2.
- Choose Year in column 3.
- Choose Title in column 4.
- Choose File Attachments in column 5.
- Choose Research Notes in column 6.
- Make your own choices for the others.
You may organize your references into groups. However, all the references are always stored in the All References folder. In the left panel there are different kinds of groups, either temporary or permanent.
If you delete a reference from All References you’ll find it in the group Trash (until you empty it). It gives you an option to take the deleted references back into your library. If you delete a reference from a group it stays in All References.
A new library begins with a single custom group set titled My Groups. However, you can create up to 500 custom group sets in your Endnote library.
- Group sets can contain any combination of groups and smart groups. Name it as a heading of the groups.
- Group To add a reference to a group you just drag and drop the reference to the selected group. Or right hand click on the selected reference and use the the option Add References To.
- Smart Groups use search criteria to dynamically update groups as existing references are edited or new references are added to the library.
- Click on Groups →
- Create a Group, a Group set or a Smart Group.
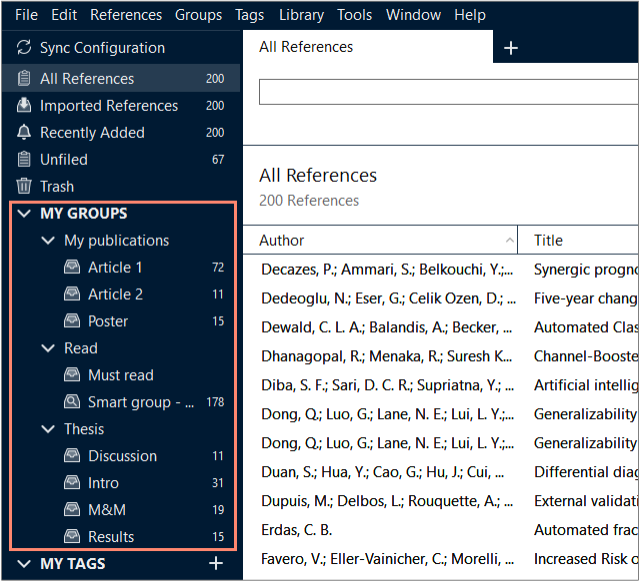
You can easily drag and drop a reference(s) into a specific Group. You can add the same reference in many Groups. You can also organize the groups into group sets by dragging and dropping the group to a named Group Set.
EndNote libraries should be kept on your computer's hard drive. EndNote libraries should never be stored in cloud-syncing folders such as DropBox etc. Syncing folders corrupt EndNote libraries over time. Learn more about the care of healthy EndNote libraries on Clarivates web page.
2. EndNote in Word (PC)
The following examples are from Microsoft Word for Microsoft 365 MSO version. If you are using a different version of Word, you can find thorough instructions in “The Little EndNote How-To Book”.
When Endnote has been installed on your computer, the Cite While You Write menu appears in Word.

There are several ways to insert citations in Word. Approach one:
1. Go to Word and place the cursor in the text where you want to add a citation.
2. Go to EndNote.
3. Select the reference you want to use. If you want more than one, use the Ctrl-key and mouse together to select several references at once. Click on the quotation marks while you are still in EndNote.

Approach two:
Go to EnNote and select the reference/s you want to use, then go to Word.
1. Click on the EndNote 21 tab.
2. Click on Insert Citation - Insert Selected Citation(s).

Approach three:
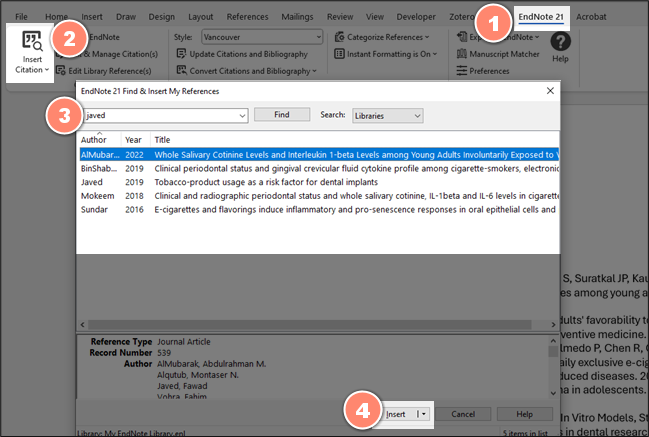
Go to Word and place the cursor in the text where you want to add a citation.
1. Click on the EndNote 21 tab
2. Click on Insert Citation
3. Search for the reference that you want to insert. You can search for an author name or a word in the title.
4. Click on Insert
Instant formatting allows you to see the reference list (bibliography) update in real-time as you add citations. However, if you're working on a large document, like a thesis, it's advisable to turn off instant formatting. This is because reformatting with each new citation can become time-consuming.
Change the default settings:
1. Open a Word document.
2. Click on the EndNote 21 tab
3. Choose Turn Instant Formatting Off

4. Restart the Word program.
Unformatted citations have curly brackets and exposed record numbers {Javed, 2019 #887}. The citations will be transformed to formatted citations when you update the bibliography according to a specific output style.
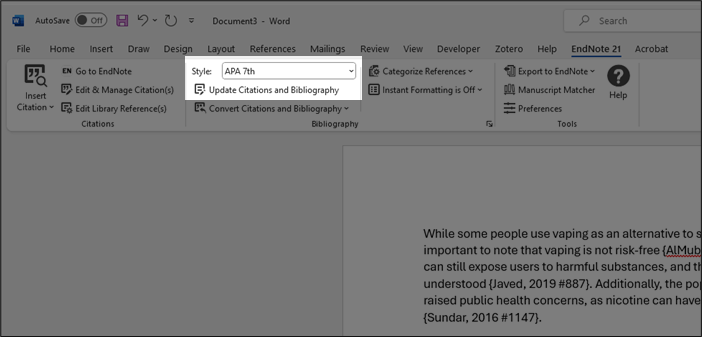
The next step is to update the in-text citations and create a bibliography according to a specific output style.
- Choose the EndNote 21 tab menu.
- Select an output style in the drop-down menu. If you don’t find your style, click Select another style and choose from a longer list.
Hint: press first letter in the name of your style to go to that letter.
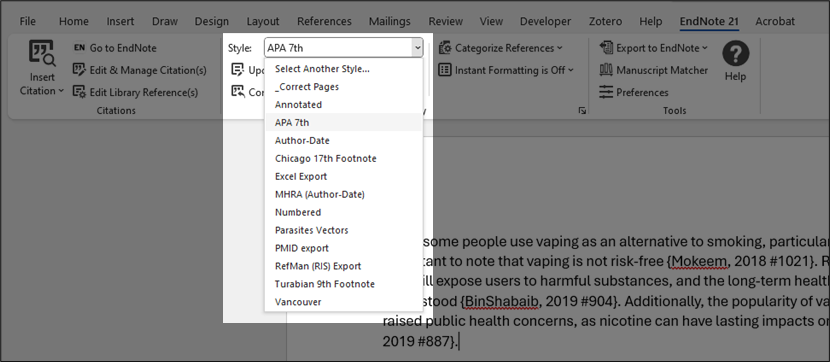
If you still do not find your output style click on visit Part 6: Tips and tricks (more output styles).
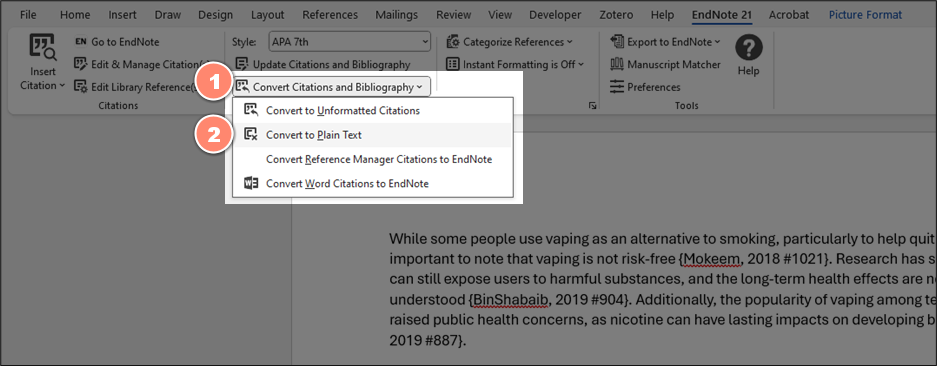
When your manuscript is finished and ready to be submitted to a journal, or if you just want to send the text to a colleague, it is a good idea to save a copy of the document in Plain Text – that is without EndNote codes.
First, make sure to save your document.
1. Click on Convert Citations and Bibliography.
2. Select Convert to Plain Text in the list.
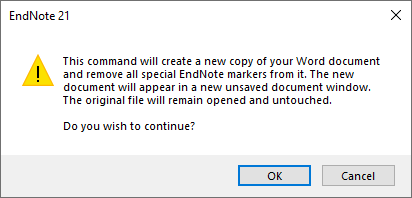
4. A dialogue box will appear informing you that a copy of your document without any codes will be created. Click OK.
5. Name the new document so that it is clear which document still has the field codes and which does not, e.g. 'with codes' and 'without codes'.
By using the Copy Formatted function you can quickly create and paste a reference list into any other document.
The references are sorted and formatted according to the rules of the selected output style.
1. Go to EndNote.
2. Choose the style you want to use by clicking Tools → Output Styles in the menu. If you don’t see the right one, click Open Style Manager to get more styles.
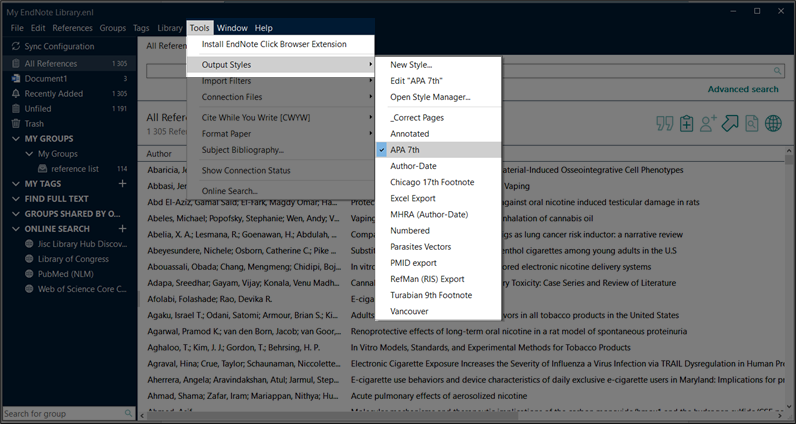
3. Select the references you want to include in the reference list. Use the Ctrl-key and mouse together to select more than one reference. Use Ctrl + A to select all references.
4. Choose References → Copy Formatted Reference
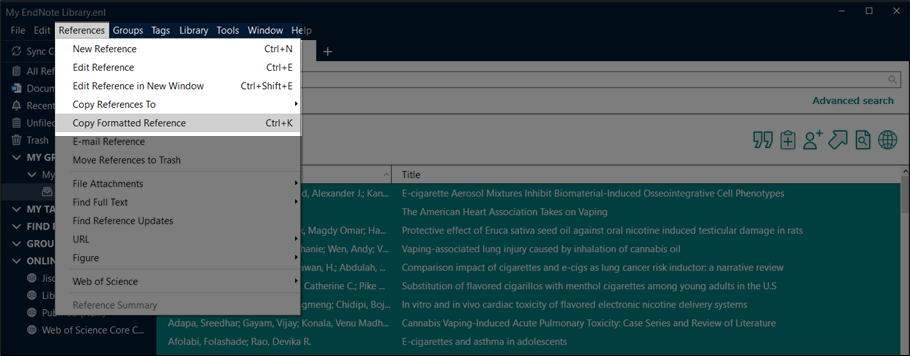
5. Switch to your document, for example Word
6. Put the cursor where you like the reference list to start
7. Click Paste
3. EndNote in Word (Mac)
The following examples are for the Microsoft Word for Mac 365 version. If you are using a different version of Word, you can find thorough instructions in "The Little EndNote How-To Book".
When Endnote has been installed on your computer, the Cite While You Write menu appears in Word.

1. Place the cursor in the text where to add a citation.
2. Go to EndNote.
3. Mark the reference you want to use. If you need more than one, use the Command key (cmd ⌘) and click on the quotation marks while still in EndNote.

4. Or go back to Word.
5. Click on the EndNote 21 tab.
6. Click on Insert Selected Citation(s).
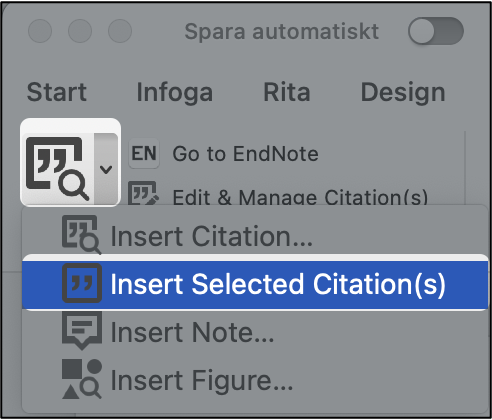
Alternatively you can search your EndNote library and insert citation by clicking on Insert Citations.
If you have a large document with many citations our recommendation is to start up by turning off the instant formatting of the bibliography. If this functionality is activated, the bibliography will automatically be updated every time new citations are added to the document.
Change the default settings:
1. Open a Word document.
2. Click on the EndNote 21 tab.
3. Choose Turn Instant Formatting Off.
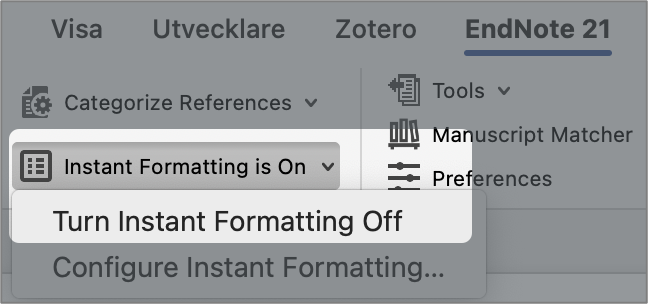
4. Restart the Word program.
The citation will appear in a coded form and will be transformed when you update the bibliography according to a specific output style.

The next step is to update the in-text citations and create a bibliography according to a specific output style.
1. Choose Configure Bibliography in the EndNote 21 tab.

2. A Configure Bibliography dialogue box appear.
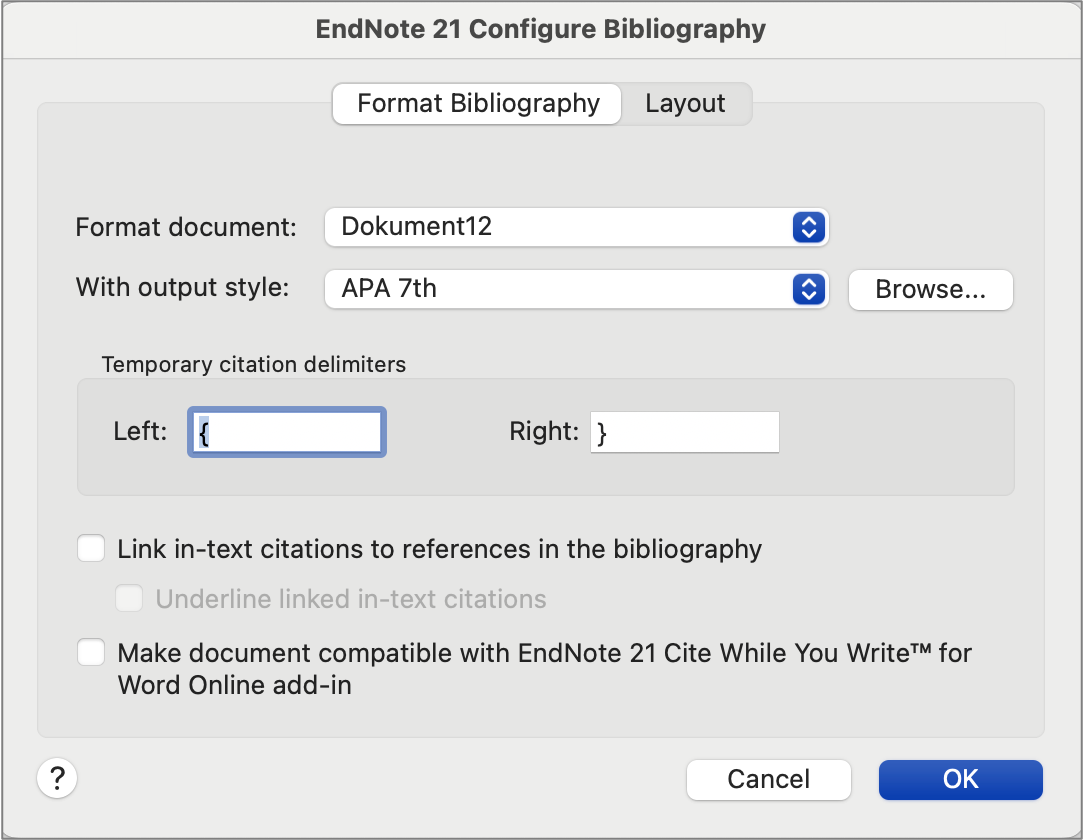
3. Choose your preferred Output Style by using Browse ... Use the initial letter for the output style, for example “L” for Lancet, to find it more easily.
4. Click OK.
If you are prompted that “The value should be between [some number] to [some number]..”. Simply change the full stop/period ( . ) to a comma ( , )
When your manuscript is finished and ready to be submitted to a journal, it is preferable to save a copy of the document in Plain Text – that is without EndNote codes.
1. Click on Tools.
2. Select Convert to Plain Text in the list.

3. A dialogue box will appear informing you that a copy of your document without any codes will be created. Click OK.
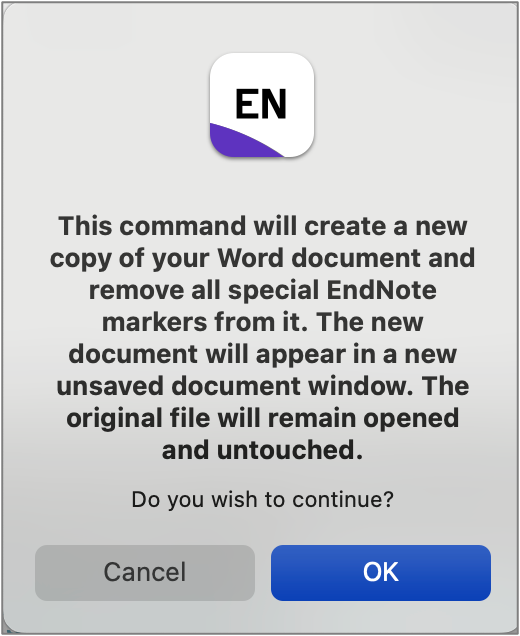
4. Name the new document so it is obvious which document that still has the field codes and which does not, for example “with codes” and “without codes”.
By using the Copy Formatted function you can quickly create and paste a reference list into any other document.
The references are sorted and formatted according to the rules of the selected output style.
1. Go to EndNote.
2. Choose the style you want to use by clicking Tools → Output Styles in the menu.
3. Select the references you want to include in the reference list.
4. Choose References → Copy Formatted Reference or right click.
5. Switch to your other document, for example Word.
6. Put the cursor where you like the reference list to start.
7. Click Paste.
4. More databases - Single reference export
1. Conduct a search in Web of Science.
2. Mark the references you would like to export to EndNote desktop.
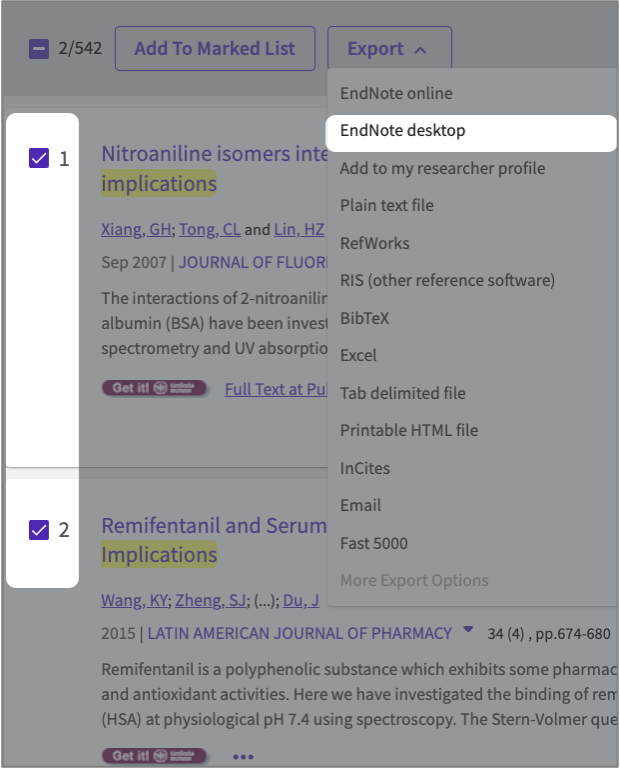
3. Click on Save to EndNote Desktop, the button above the result list.
4. In the pop-up window, if you only want to export your selected references, proceed to step 5. But if you want to export all references, when fx. conducting a systematic review, you need to divide the references in batches (if the amount is more then 1000) and export them in separate files. Fx. first 1-1000, and then continue with 1001-2000 and so on until you have exported all references.
5. When you have decided which references to export, choose Record Content: Full Record, and then Export.
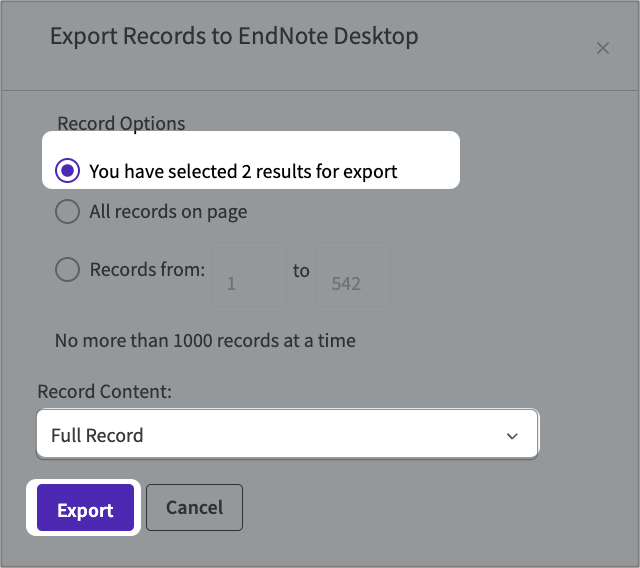
6. In EndNote, go to File and Import… and select ISI-CE as import option.
Libris is the Swedish national search service providing information on titles held by Swedish universities and research libraries, as well as many other public libraries. Here you find books, reports, dissertations etc.
1. Conduct a search in LIBRIS.
2. Choose a reference by clicking on the title.
3. Click on the button Cite.
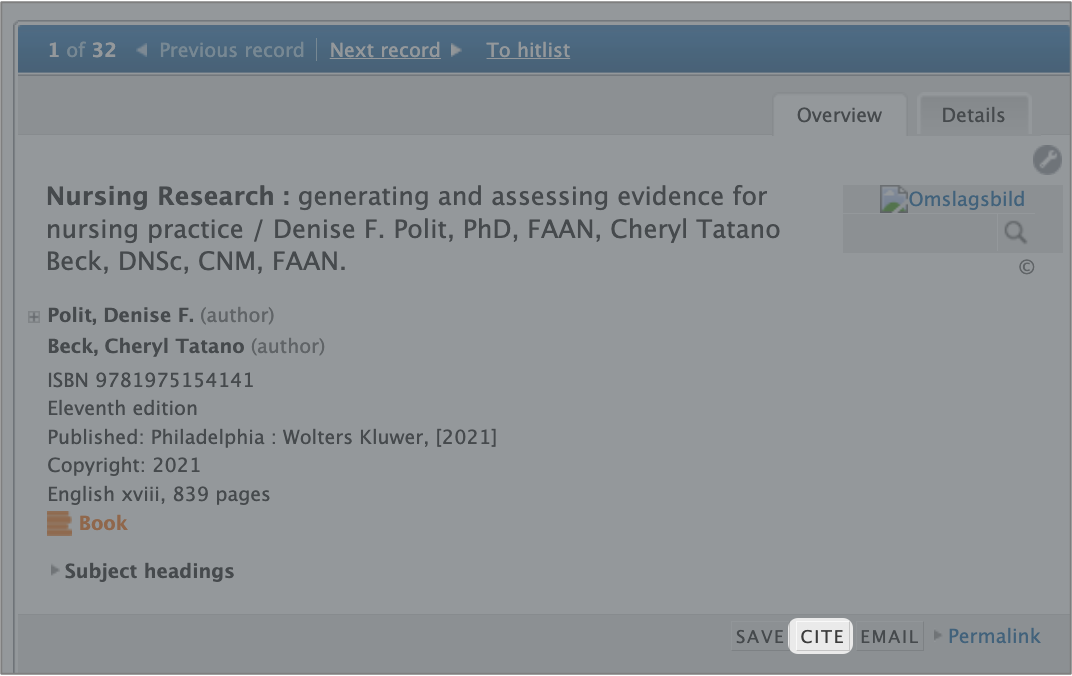
4. Choose .RIS in the dropdown menu after the heading Format.
5. Click on Save as file.
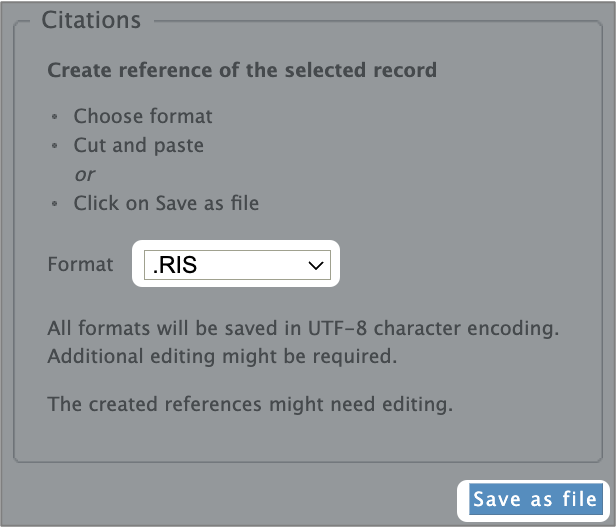
6. Go to EndNote. Import the file using the Reference Manager (RIS) import filter.
Ovid is a database interface providing access to:
- MEDLINE (Ovid), the core database of Pubmed.
To import references from an Ovid database:
- Conduct a search in MEDLINE.
- Select references and click on Export.
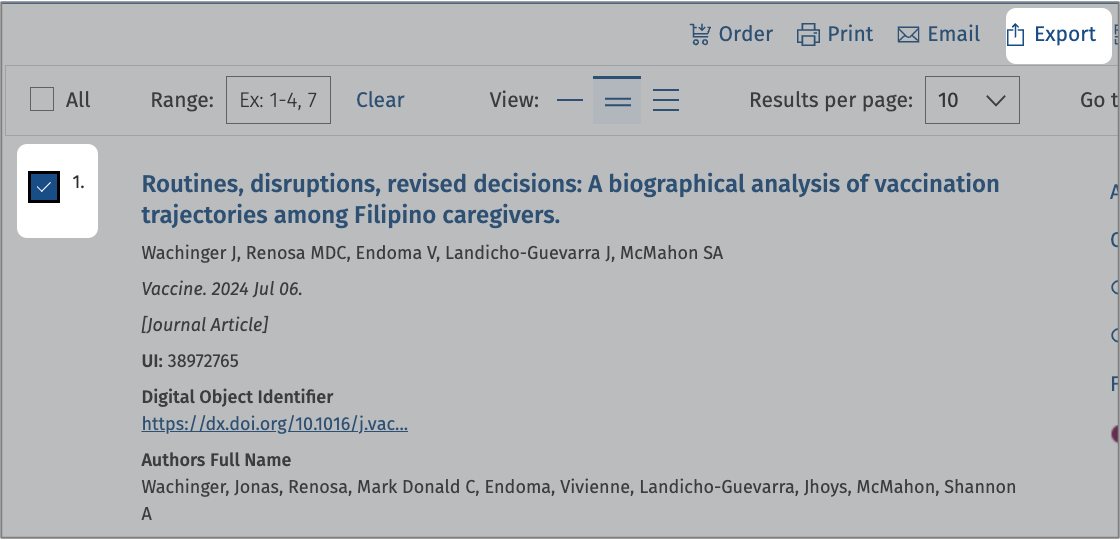
3. Choose RIS format, "Complete Reference" fields and Export.
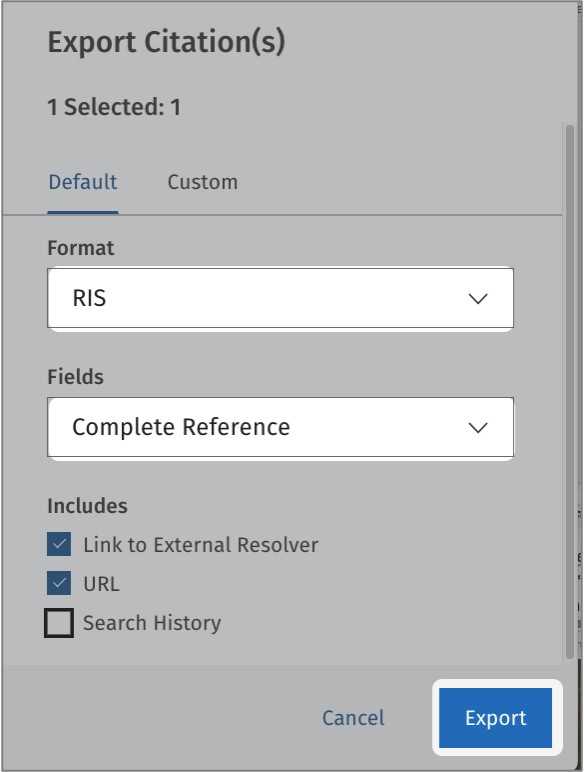
4. In EndNote, go to File and Import... and select RefMan RIS.
1. Conduct a search on Karolinska Institutet University Library website.
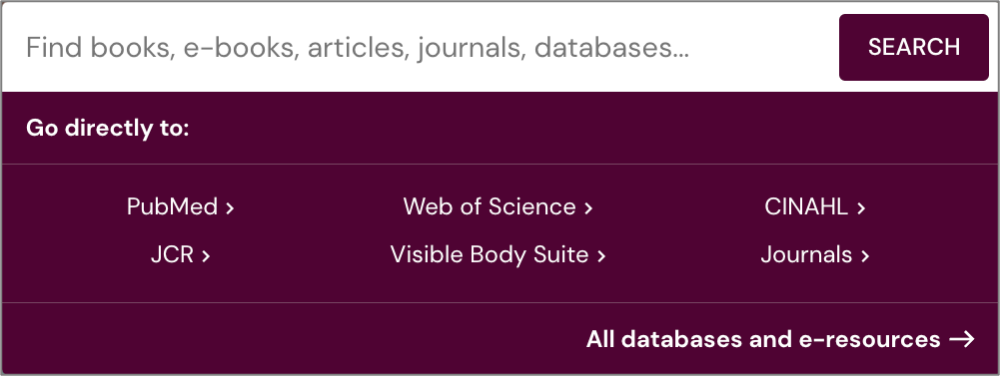
2. When you have found a reference you want to save to your EndNote library, click on the three small dots to the right.
3. An extended view will appear, as you can see below and you get the possibility to export the reference by clicking on RIS (EndNote) and then Download
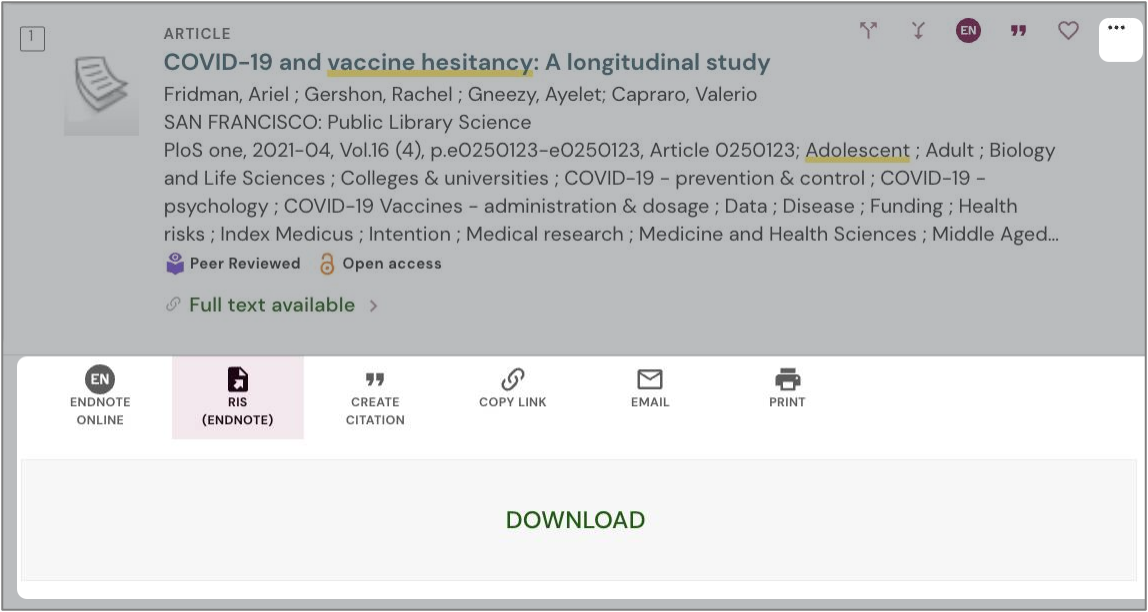
4. In EndNote, go to File and Import... and select RefMan RIS.
Embase is a comprehensive biomedical database, including Emtree, specialized in pharmacology and toxicology.
- Conduct a search in Embase.
- Select references and click on Export.
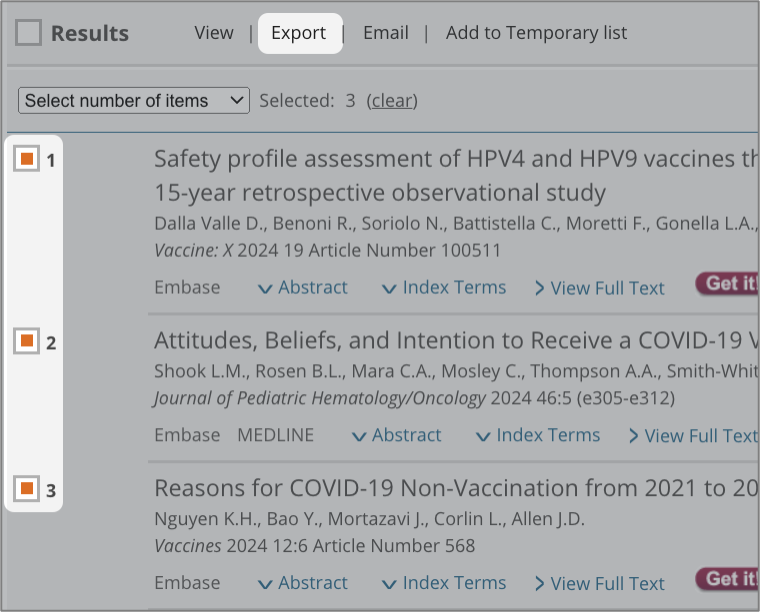
3. Choose RIS format (Endnote). Click on Export.
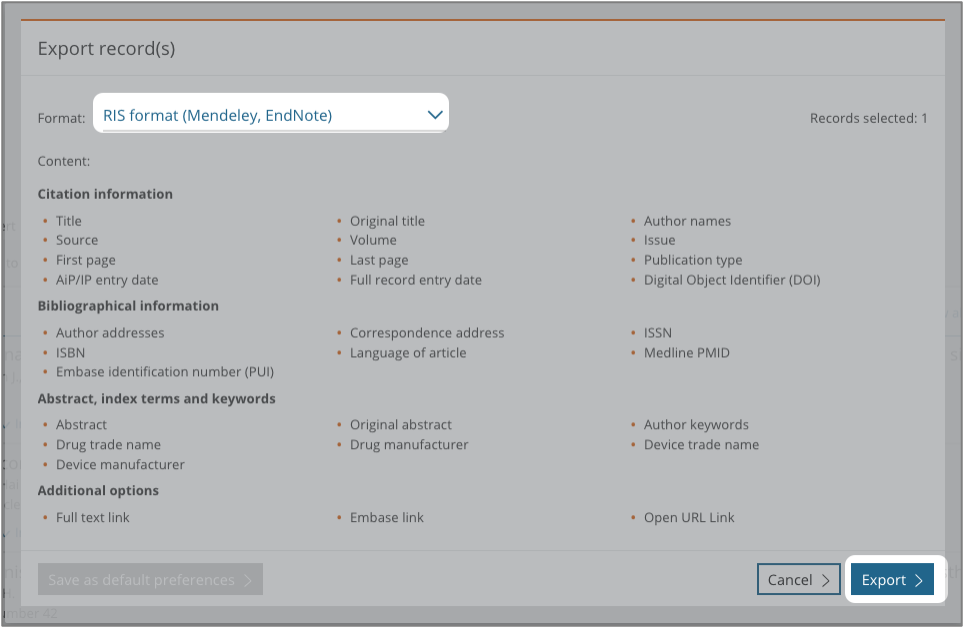
4. A pop-up window usually appears. If nothing happens make sure you have allowed pop-up windows for the site.

5. Click on Download
6. In EndNote, go to File and Import... and select RefMan RIS.
We have both CINAHL and PsycINFO via EBSCO, thus exporting from PsycINFO is similar to this description.
1. Conduct a search in CINAHL (EBSCOhost).
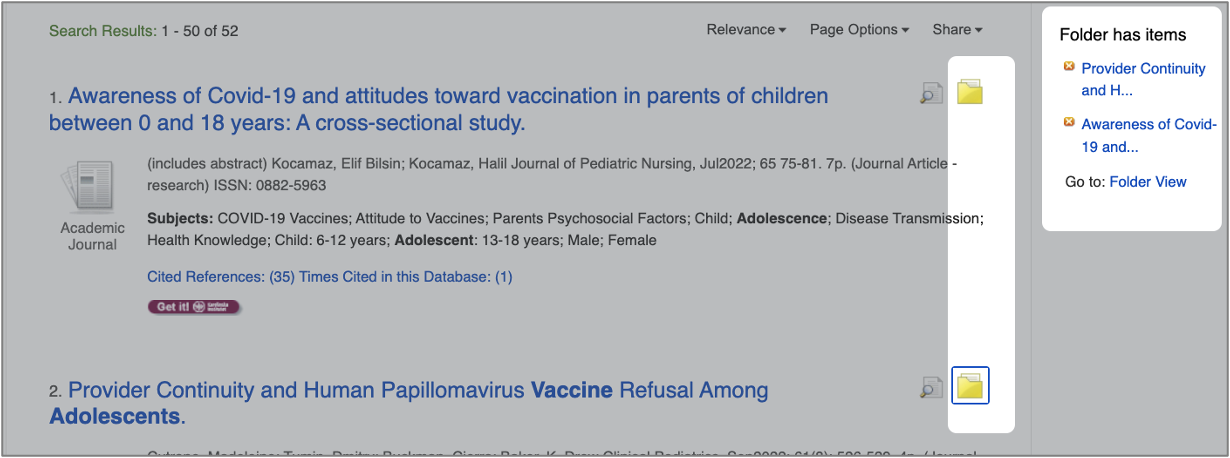
2. Select a reference by using the blue Add to folder button for saving your references in a temporary folder for later import in to EndNote. The blue button turns into a yellow folder (see the picture above) so that you easily can see which references you have saved temporarily.
3. In the right menu, choose Folder view.
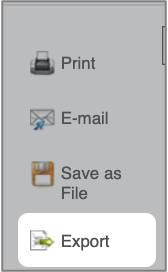
4. In the right menu, choose Export for export of your references.
5. Choose Direct Export in RIS Format /.../ and Save.
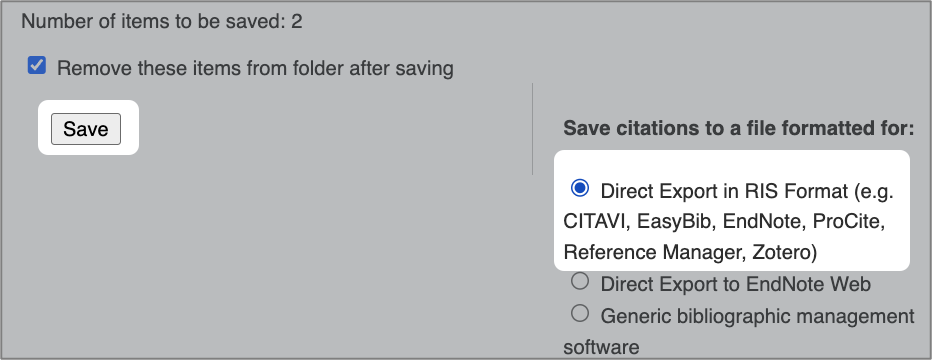
6. In EndNote, go to File and Import... and select RefMan RIS.
Firstly, change a setting in Google Scholar: click on Settings and in the Bibliography manager, choose Show links to import citations into EndNote and Save.

Conduct your search in Google Scholar.

Click on Import into EndNote (only one reference can be imported at the same time) and save the file.
In the database ERIC, you will find references to literature in education, leadership and management.
1. Conduct a search in ERIC (ProQuest).
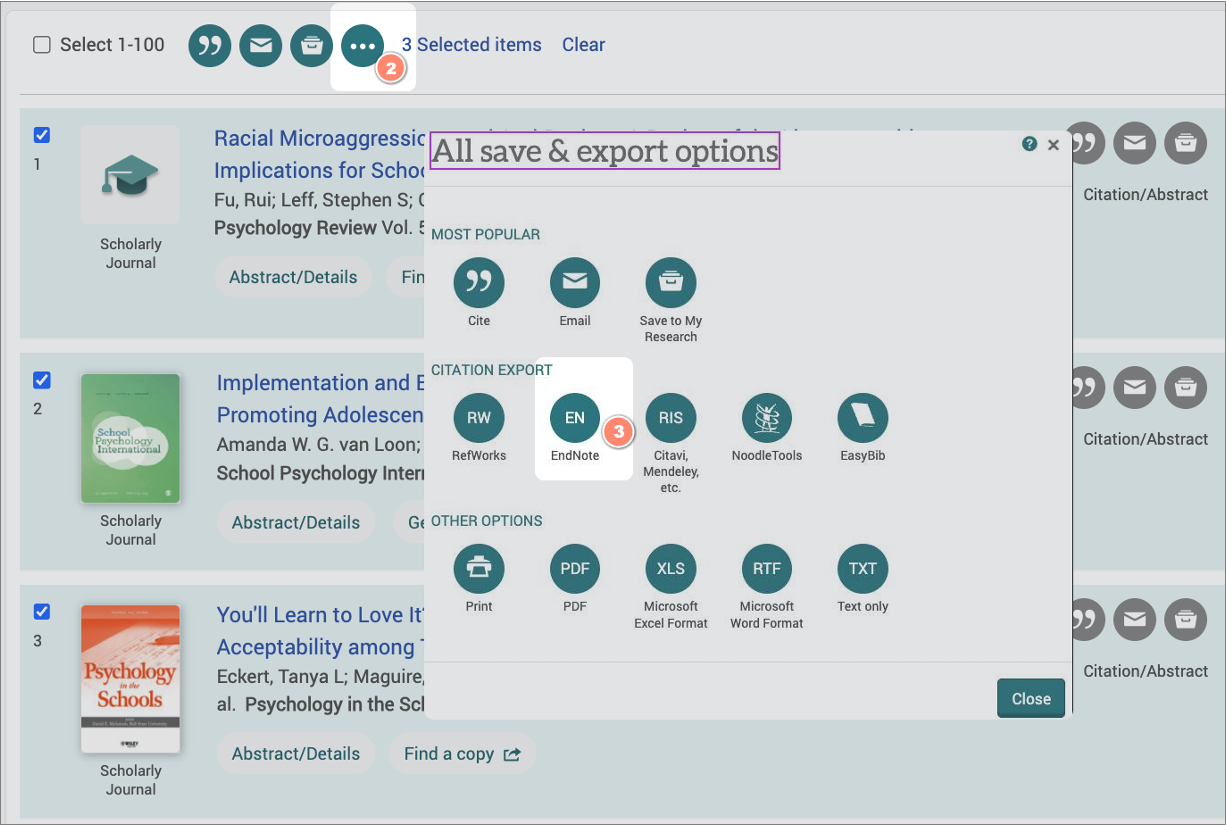
2. Select references and click on the three dots (All save & export options)
3. Choose EndNote
4. Click on Continue.
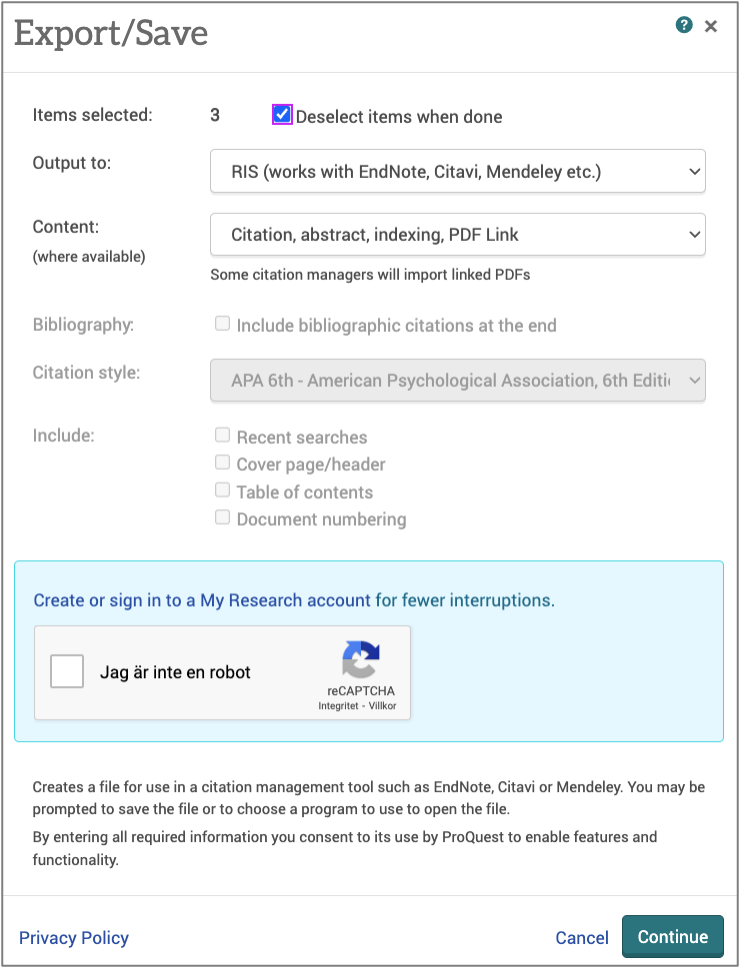
5. When the file is saved on your computer, go to EndNote, File and Import... and select RefMan RIS.
WorldCat is the world's largest network of library content and services; excellent for finding books, ebooks, theses and dissertations.
1. Conduct a search.
2. Click on a specific item.
3. Click on the quotation mark icon and Download RIS.
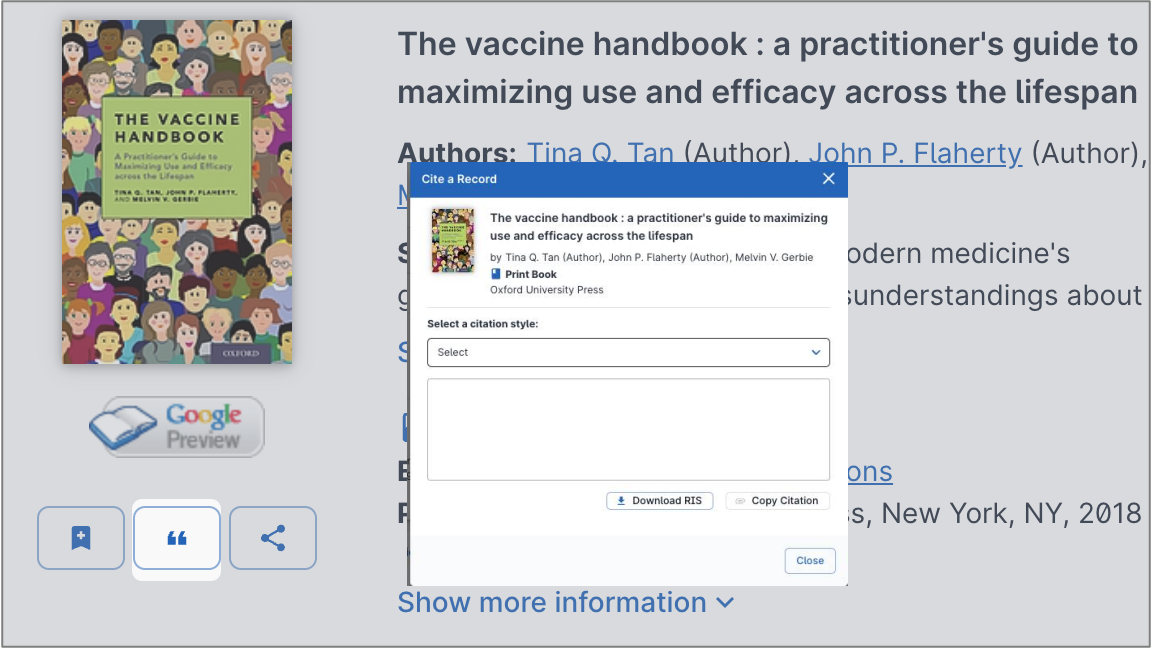
4. In EndNote, go to File and Import... and select RefMan RIS.
5. More databases - bulk export
1. Conduct a search in PubMed.
2. If you want to export all results you do not need to select any references.
3. Click on the Send to button.
4. Choose Citation manage.

5. Choose All references and click on Create File.

In Chrome, Firefox and Safari:
When the file is downloaded to the computer, right-click the file and choose ”Open with“ and then ”EndNote 21“. You can tick a box and have Chrome do this automatically in the future.
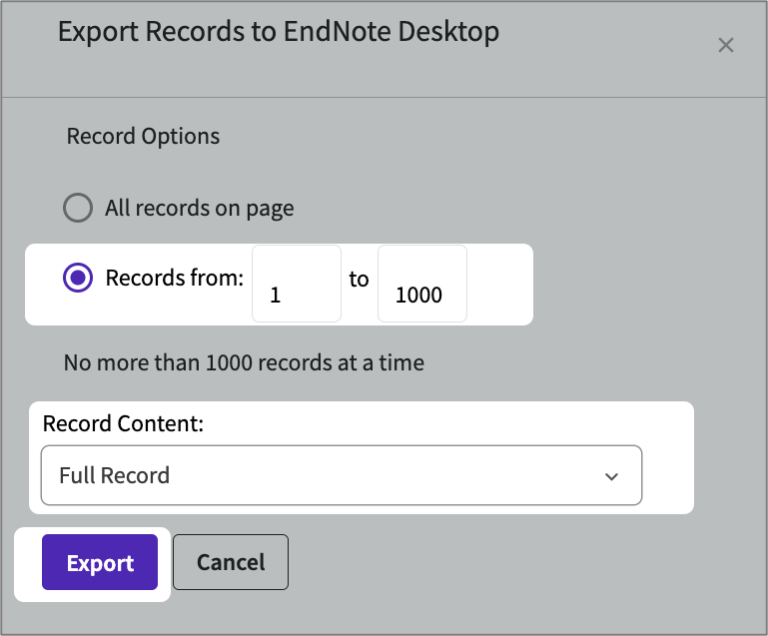
You can only export 1000 references at a time in Web of Science, and thus you will need to divide your references into batches of maximum 1000 in each batch and export them in separate files.
1. Conduct a search in Web of Science.
2. Click Export above the results list, choose EndNote desktop.
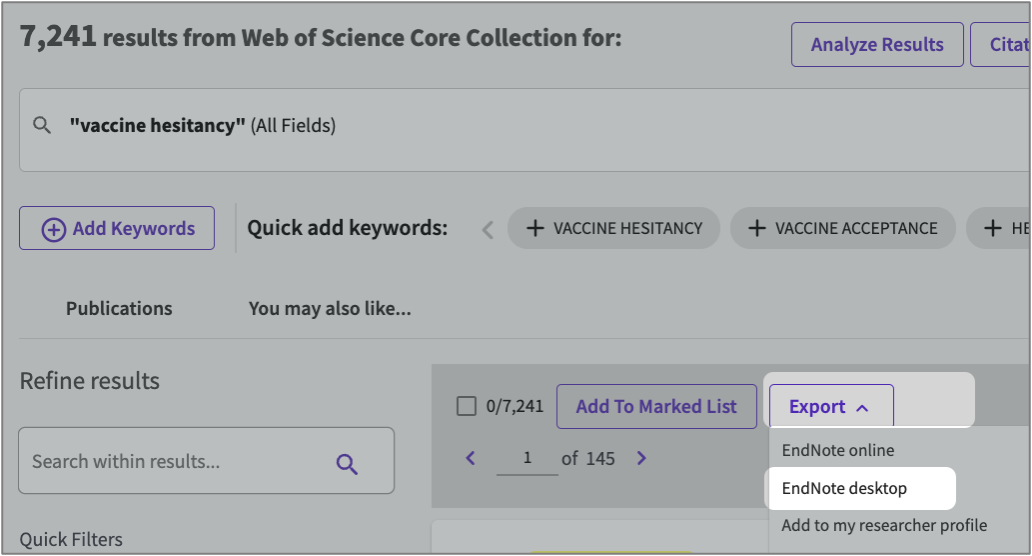
3. In the pop-up window choose Records From and type in 1 to 1000 and choose Full Record as Record Content and export
4. Go back to your results list, export once again but now type in records 1001 to 2000 and so on until all records are downloaded.
In Medline (Ovid) you can export 5000 references at a time, be aware the more references you need to export in one batch the longer the wait for the database to process.
1. Conduct a search in Medline.
2. In Range add the amount of references to be exported, in this case 1-2348
3. Click on Export.

4. Choose RIS format, Complete Reference fields and Export.

5. Import your references into your EndNote Desktop library.
Through the database provider EBSCO you can export 25,000 references in a batch, and it’s seldom you actually need to export more than that.
-
Conduct a search in either Cinahl och PsycInfo.
-
Click on Share and choose E-mail a link to download exported results.
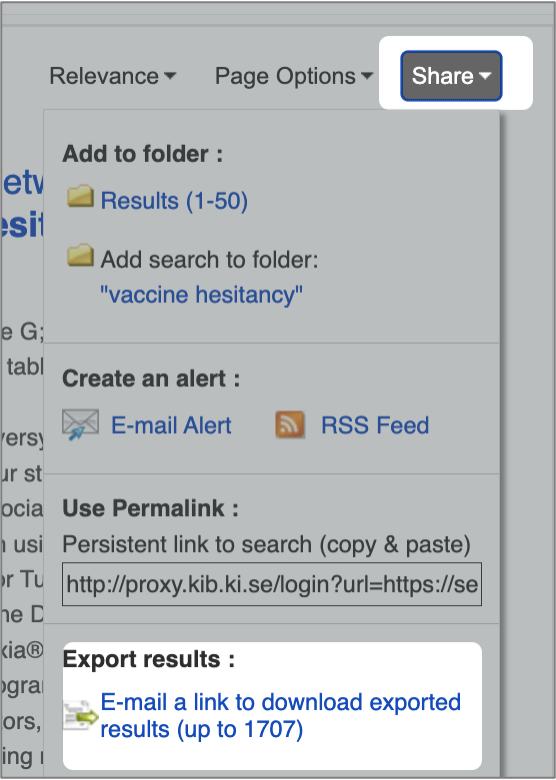
3. Add your e-mail address and chose RIS Format.
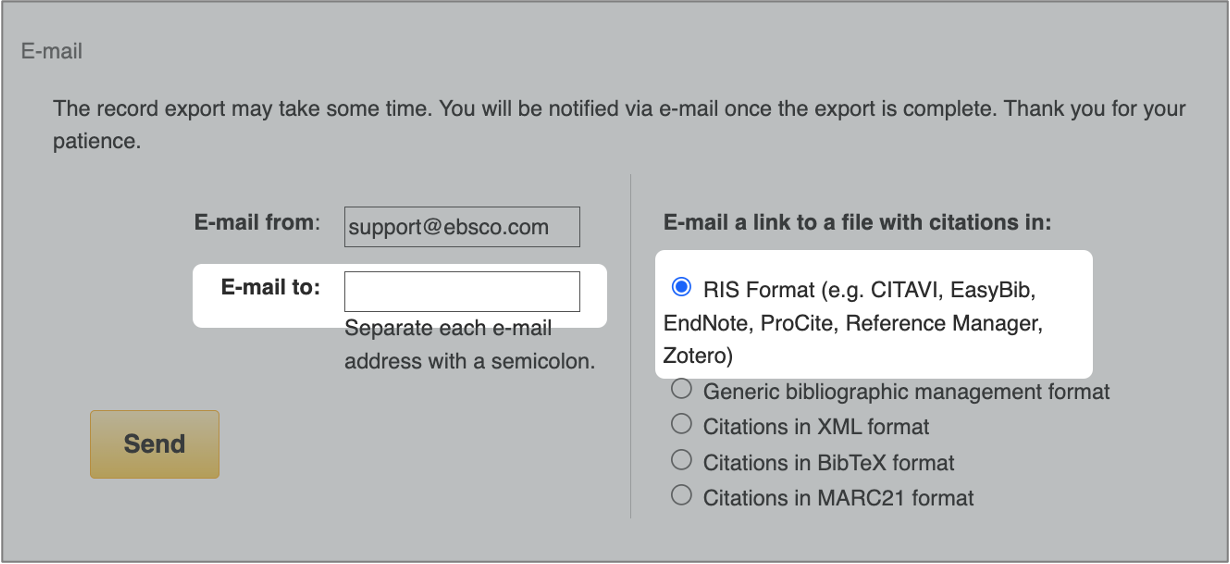
4. Usually, you get the link to download in a couple of minutes, but sometimes it might take longer. Download the zip-file when you get the e-mail and make sure to change the file name if you need to use the export later.
5. Import the references to your EndNote Desktop library.
In Cochrane Library you can export 20,000 references in one batch. Be aware you need to keep track of which references you are looking at when exporting.
1. Conduct a search in Cochrane Library.
2. Do you want to export just Trials? Just Cochrane Reviews? Other types?
3. Choose the type of references you want to export, in the screenshot below the choice is set to Trials.
4. Check the box Select all (xxxx).
5. Click on Export selected citation(s).

A dialog box will appear.
6. Choose RIS(EndNote) and make sure Include abstracts is checked and click on Download.
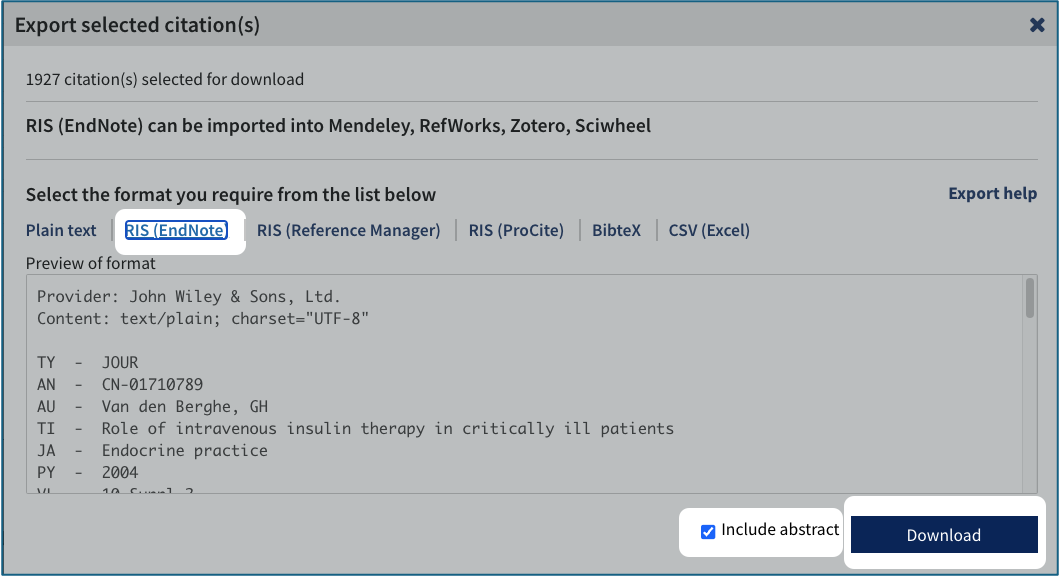
7. Import your references into your EndNote Desktop library.
In the ProQuest databases you need to sign in to your ProQuest account (or create one) to export more then a 100 references.
1. Start by signing in to your ProQuest account.
2. Conduct a search in fx. ERIC.
3. Click on Export results.

A dialog box will appear, continue by:
4. Select format RIS, check the bock to Include abstracts and click on Accept.
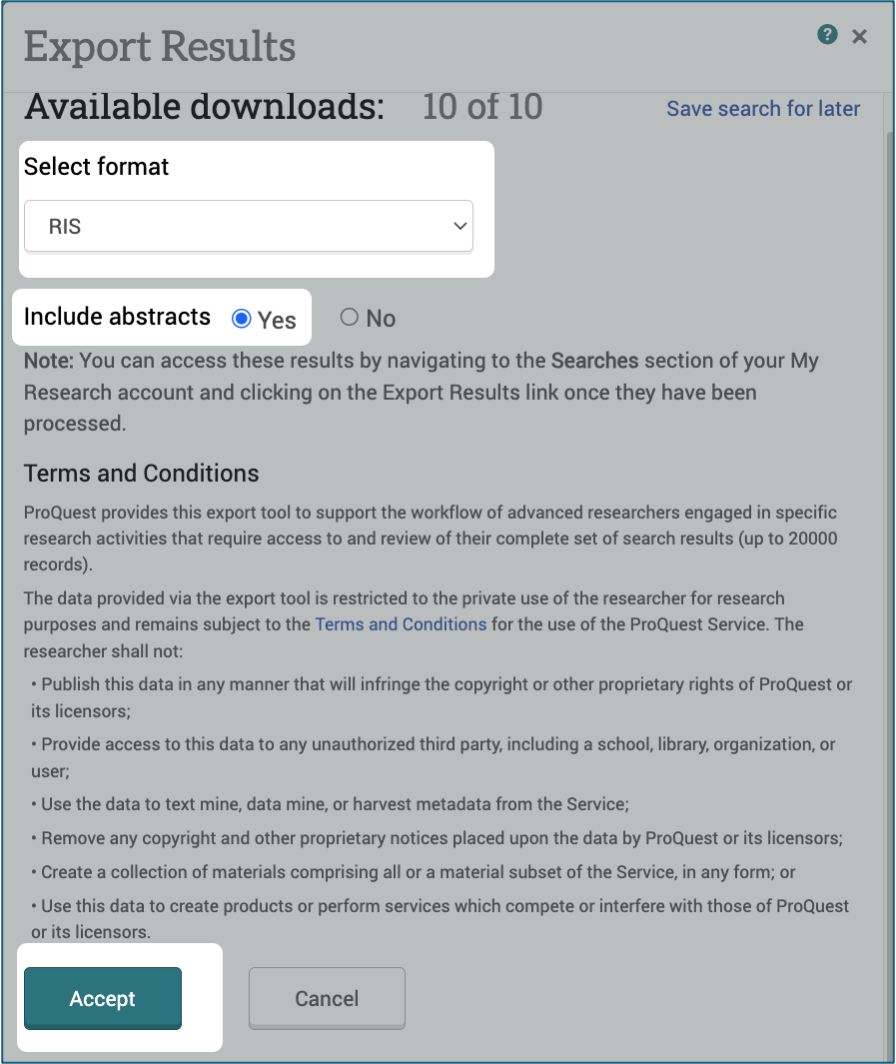
5. Now you need to go to My research.
6. And Saved searches
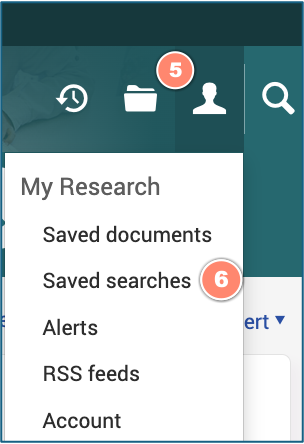
7. Click on Export results.
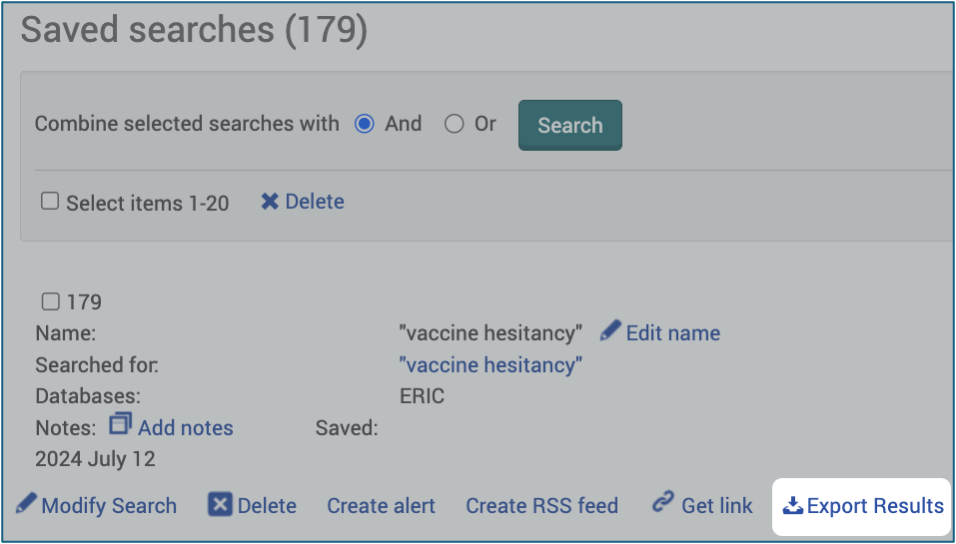
When the file is saved on your computer, go to EndNote, File and Import... and select RefMan RIS.
To export more than 500 results from Embase you need to sign in to your Embase account.
1. Conduct a search in Embase.
2. Click on Select number of items.
3. Choose the amount of references you need to export.
4. Click on Export.
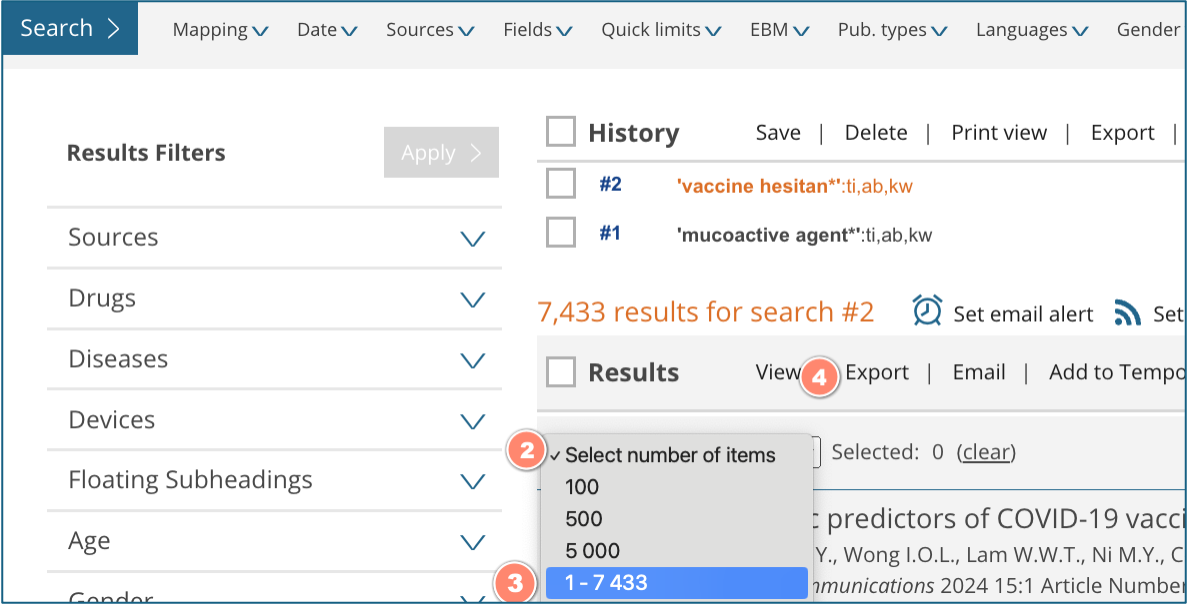
Follow steps 3-6 under 4: More databases - Single reference export
6. Tips and tricks
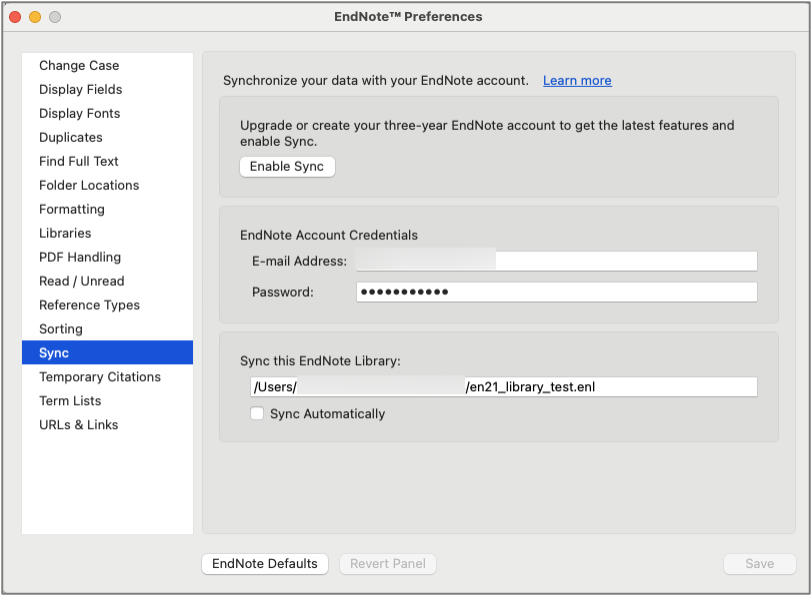
You’re able to access your references from anywhere and manage your EndNote library from any computer using EndNote Online, including a three year access. The EndNote Online account compatible with EndNote 21 differs from the EndNote Online Classic version.
Are you about to write an article/report/essay/text together with one or more colleagues and thinking about how you could integrate EndNote while working on the same document?
- Our recommendation when cooperating on a document is making one person the administrator of the EndNote library, meaning this person is the only one actually taking care of the library and adding EndNote references into the word document. If you organize the writing process in this way, our experience is that you will encounter fewer problems.
In EndNote version X7, X8, X9, 20 and 21 there is a functionality called Library sharing. For this to work you need to have an EndNote Online account.
You have the possibility to find duplicates in your library and edit the information in the reference you want to keep.
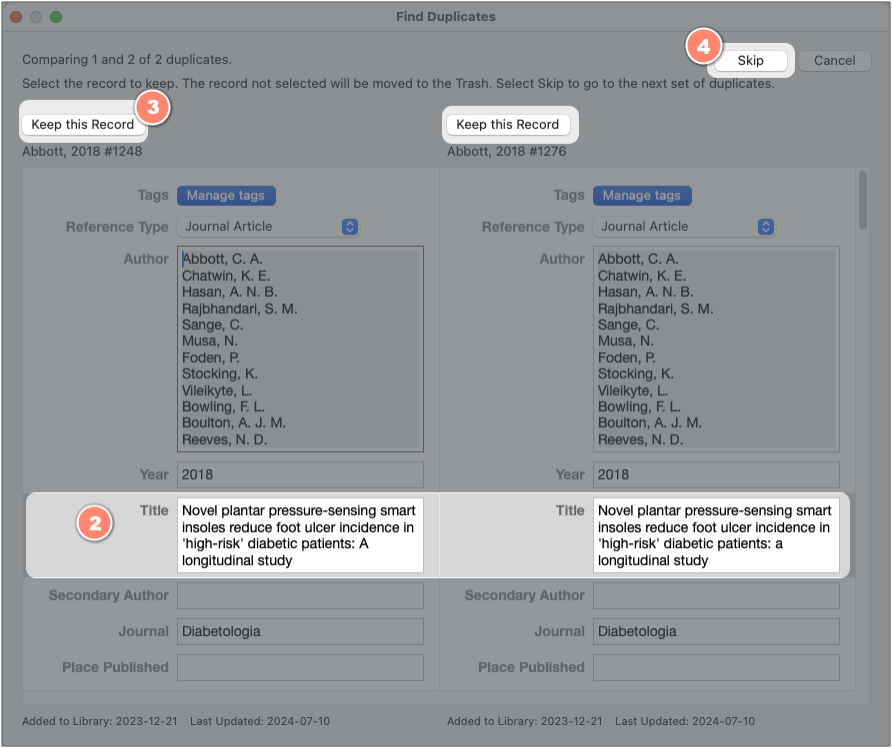
1. Go to Library → Find Duplicates. By default, Endnote identifies duplicate references in a library by matching Author, Year, Title and Reference type fields.
2. The program highlights the information that differs between the duplicates.
3. Choose which reference you want to keep by clicking on Keep this Record.
4. Not a true duplicate? Click in Skip.
Unfortunately you can’t be sure that there are no duplicates left. If the references are imported from different databases, there could be some disparities that make the EndNote program treat them as unique references. To be absolutely sure, you must check the list manually as well. Maybe the most efficient way is to browse after you have sorted the library by titles.
If you want to proceed with a more advanced deduplication method, you can follow this guide - https://www.ncbi.nlm.nih.gov/pmc/articles/PMC4915647/
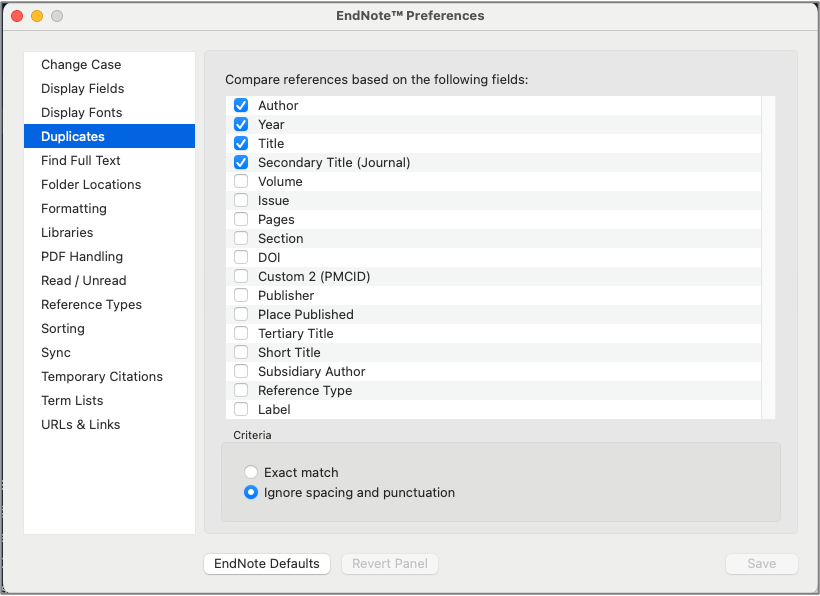
To change the fields that should match go to:
- Edit → Preferences → Duplicates on a PC
- EndNote 21 → Settings → Duplicates on a Mac
now you can choose fields that will get compared.
If you want to have suggestions on journals where to submit your manuscript, you can try the Manuscript Matcher in EndNote. You start by selecting the group that contains the references used in your manuscript and then adding information about your manuscript; title and abstract. You will get suggestions on journals included in the database Web of Science. (The suggestions are based on analysis of published papers and citations.)
1. Go to Word.
2. Choose EndNote 21 tab.
3. Click on Manuscript Matcher.

To be able to proceed with the request you will need to have an EndNote Online account.
EndNote is loaded with a limited amount of output styles, import filters and connection files. That is due to computer performance: it takes too much time to open the program with all the files in the program – and you don’t need them all! Instead, visit EndNote Output Styles and download the files you need.
Do the following steps:
1. Go to EndNote.
2. Click on Help and choose EndNote Output Styles.
3. Click on Add output styles.
4. Type the name of the journal.
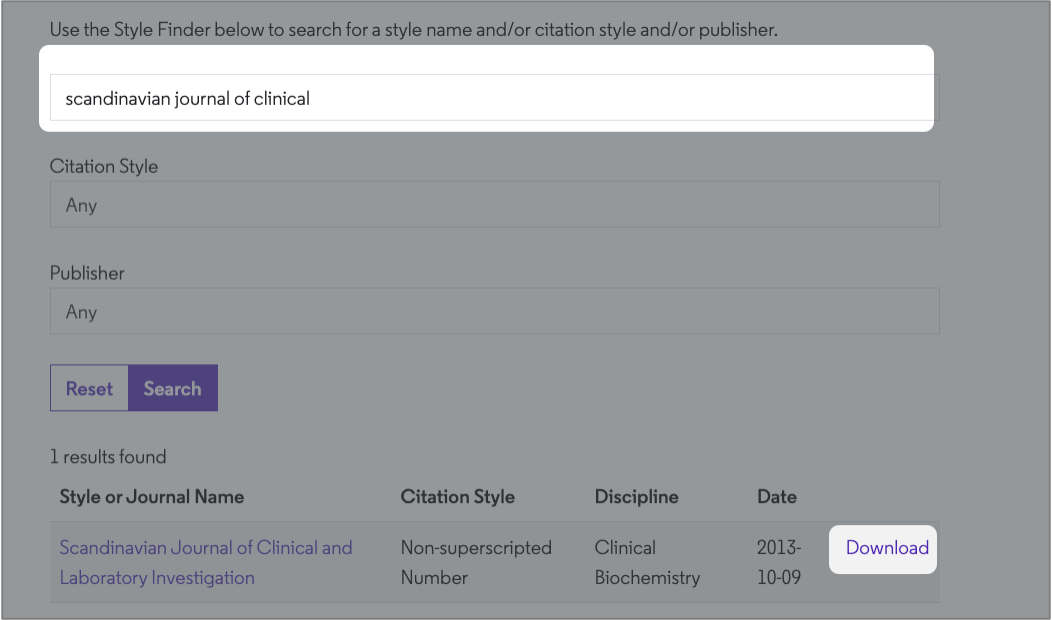
5. Download and save the file.
6. Open or double-click on the downloaded file and Endnote will be launched.
7. Go to File menu and choose Save As.
8. Go to File menu. Click on Close Style.
Be aware that output styles change over time, and the downloaded style may not be up-to-date. Make sure to check if the references look as intended.
Different reference styles (Output styles) are using either full journal titles or different kinds of abbreviations. By using Term Lists in EndNote, this problem can easily be solved.
1. In EndNote, go to Library → Open Term Lists → Journal Terms List.
2. (If the Journal Terms List is empty, skip to step 4.) Highlight the first journal, and press [Ctrl]+A (or [command]+A on a Mac) on the keyboard to highlight all the terms.
3. Press the Delete Term button to the right. Now we have a clean slate to start with.
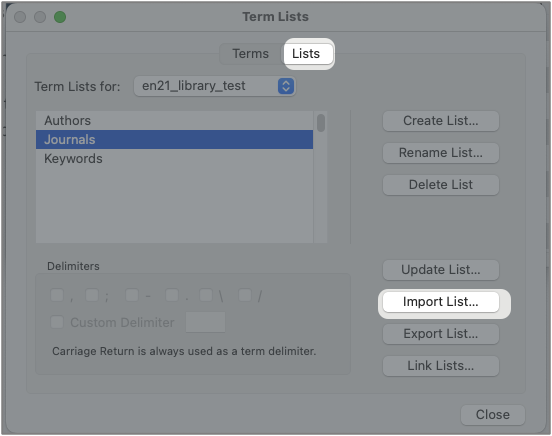
4. Go to the Lists tab at the top, and click on the Import List button.
5. Browse to the Term Lists folder within the Endnote folder. Import term list for Medical, BioScience and in some cases Chemical depending on your area of research.
– Windows: C:\ Program Files \ EndNote \ Term Lists.
– Mac: Applications \ EndNote \ Terms
If your output style is still not using the correct substitution, check as below:
1. Go to Tools → Output Styles → Open Style Manager.
2. In the list of styles, highlight the style you are using and click Edit.
3. Choose Journal Names.
4. Make sure the style is using the Full Name or one of the Abbreviations, and you should be all set.
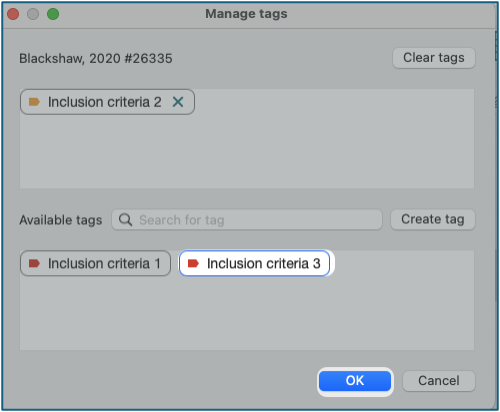
A new feature in EndNote 21 is the possibility to add and manage Tags in your library.
1. Add a tag by clicking on the plus sign next to My Tags.
2. Choose a colour for your new tag, add a name to it and click in Create Tag.
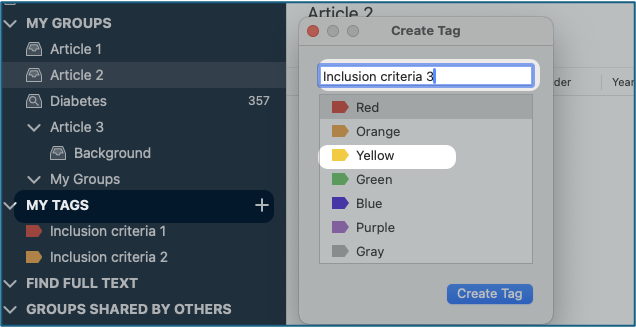
3. Highlight the references you intend to tag, left click in the blue area and choose Manage tags.
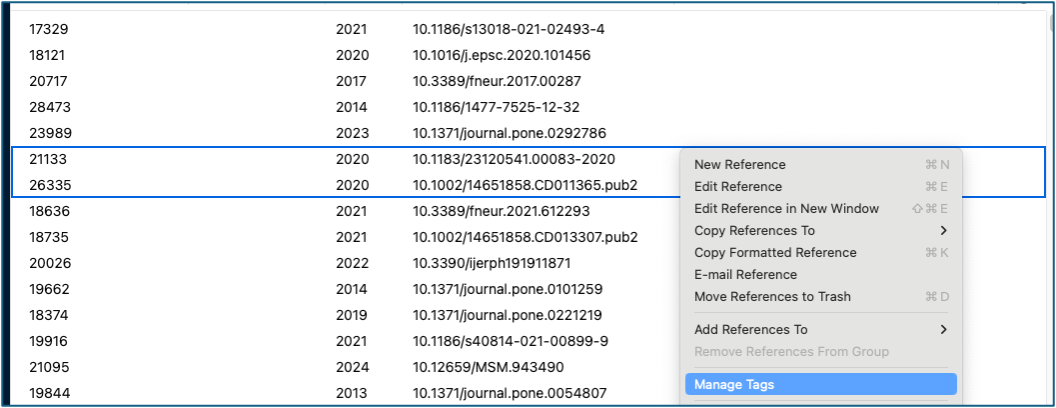
4. Click on the tag you want to add and finish with OK.
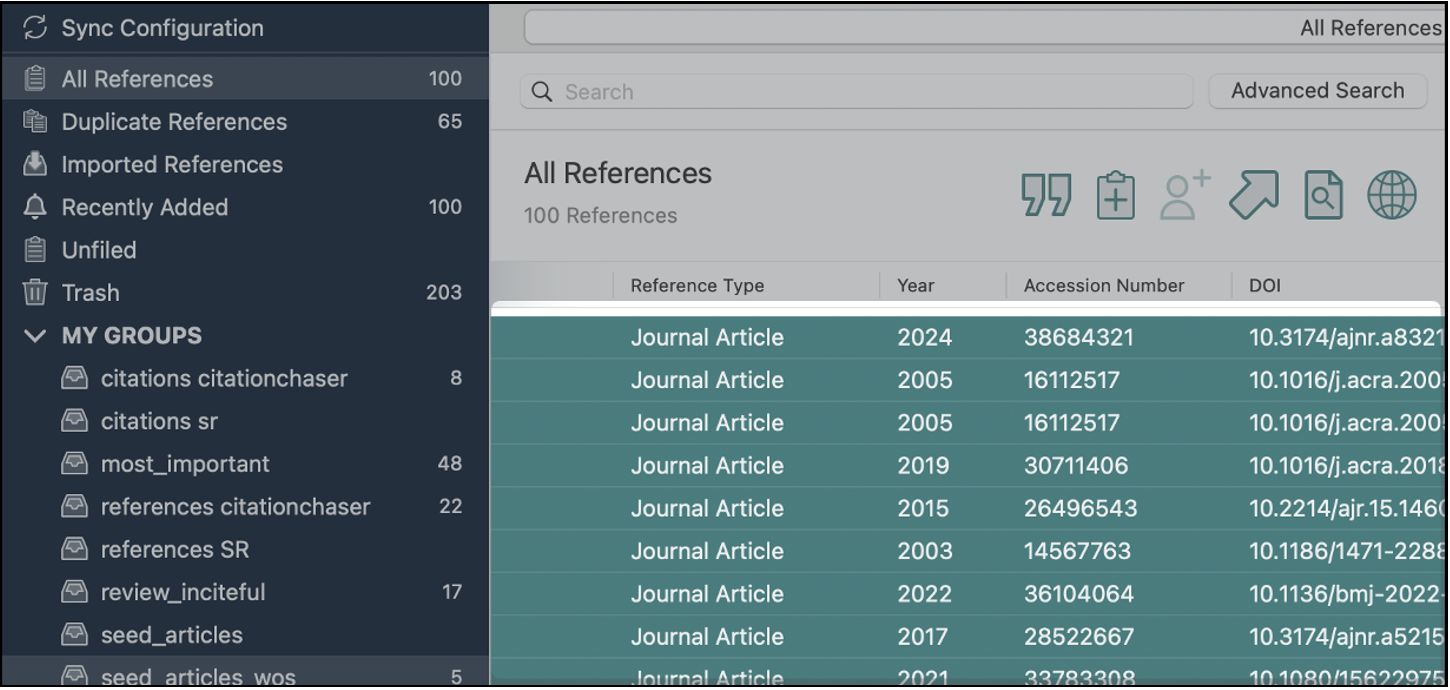
Sometimes you might need to export references from your EndNote library. Maybe you want to share them with someone using another reference manager or maybe you need to export them for other reasons. If you want to export all references, make sure you are in the All references group in your library.
- Mark all reference either using command + A or ctrl + A (depending on if you use a Mac or PC).
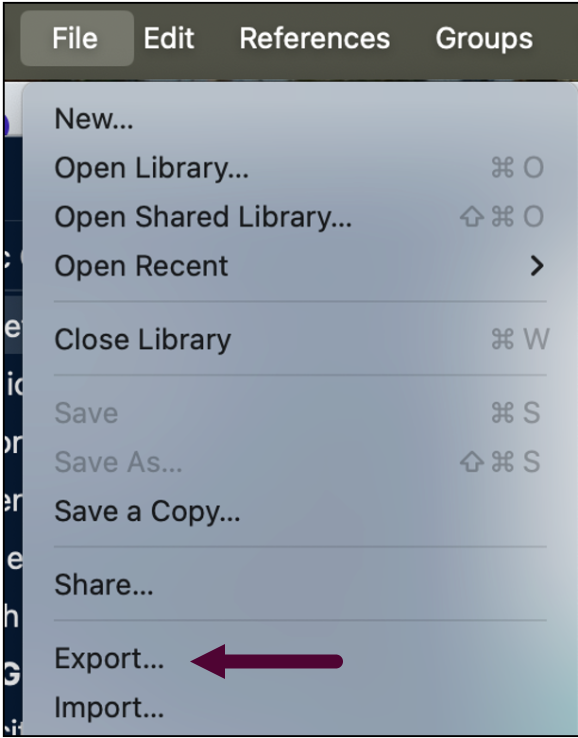
2. When you have marked all references you want to export, go to File in the menu and click on Export
3. Choose your selected style for export under Output Styles. When sharing references with others RefMan (RIS) Export is a good choice, but you can also choose other like BasicExportToExcel.

Make sure you save your export and share it with your colleauges or save it for later.
Would you like to know more?
You can find more guides to EndNote 21 and also to older versions (EndNote 20, EndNote X9, EndNote X8 and EndNote X7) at Clarivates homepage.

Support in information searching
Are you looking for scientific articles or writing references and need advice? You can get help from our librarians. We offer both drop-in via Zoom and booked consultations.
Opening hours booked & drop-in support in Zoom
If you would like us to get back to you, please submit your contact information in the form below along with your feeback.
